Category Archives: Linux
Linux下部分删除history记录
Linux环境: CentOS Linux release 7.3.1611 (Core) 目的: 保护操作隐私。。 首先看history命令详细情况: 一般我们已知的是history -c 命令,即清除所有历史记录 但是如果服务器用的是公司的,就不好执行这种粗暴的操作了。。 部分删除操作: 1.vim ~/.bash_history 该文件即为历史记录存储文件,我们随意修改 2.修改后再次 history 查看,发现并没有变化。原因:缓存 执行:history -r 读取历史文件并将其内容添加到历史记录中,即重置文件里的内容到内存中,完成修改! from:https://blog.csdn.net/abysscarry/article/details/79700293
View DetailsCentOS 7 最小化安装的无线网络配置
1.首先下载iw工具。 yum -y install iw 2.获取无线网卡的名称 执行iw dev,假设获得名称为 wlp3s0(示例) 3.激活无线网络接口 执行ip link set wlp3s0 up 4.扫描当前环境中的无线网络 执行iw wlp3s0 scan|grep SSID,假设你能够连接的网络名称是TP-LINK-1(示例) 5.登录指定网络 执行wpa_supplicant -B -i wlp3s0 -c <(wpa_passphrase "TP-LINK-1" "此网络的密码") 6.主动请求动态地址 dhclient wlp3s0 7.查看获取的网络地址 执行ip addr show wlp3s0 上善若水,水利万物而不争。 from:https://www.cnblogs.com/yoyotl/p/6090721.html
View Detailslinux下移植wifi之安装iw and iw操作(五)
第四节 安装iw and iw操作 一、 先查看README,获取了三个有用点: 1. This is 'iw', a tool to use nl80211(iw需要nl80211) 2. To build iw, just enter 'make'. If that fails, set the PKG_CONFIG_PATH environment variable to allow the Makefile to find libnl.(通过这个参数来指定libnl库的位置) 3. 'iw' is currently maintained at http://git.sipsolutions.net/iw.git/,(iw软件下载网站) 4. some more documentation is available at http://wireless.kernel.org/en/users/Documentation/iw. (iw 操作说明文档) 解压:tar -xf /mnt/hgfs/linux_share/0711/iw-4.9.tar.xz nl80211已经安装了,通过PKG_CONFIG_PATH变量,我们已经指定了nl80211头文件和库的路径,可以通过命令进行查看。 命令:echo $PKG_CONFIG_PATH 得:/home/clh/work/libnl-3.2.25/tmp/lib/pkgconfig: 二、编译 在info.c的代码前面添加 #define htole16(X) (((((uint16_t)(X)) << 8) | ((uint16_t)(X) >> 8)) & 0xffff) 修改Makefile ,加上libnl的头文件 和 lib库。 CFLAGS += -I/home/clh/work/libnl-3.2.25/tmp/include/libnl3 LDFLAGS += -L/home/clh/work/libnl-3.2.25/tmp/lib make CC=arm-linux-gcc make DESTDIR=$PWD/tmp […]
View Details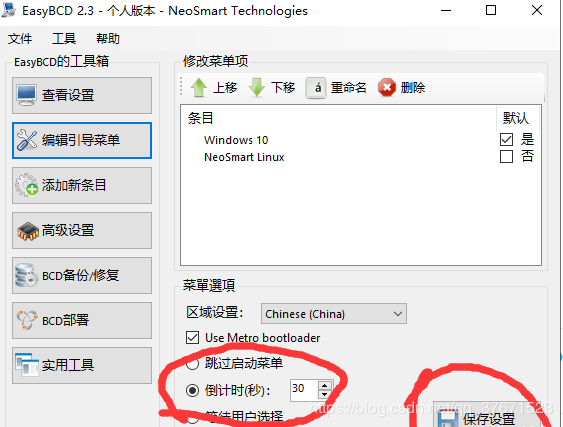
centos7 与windows10之间的开机引导
一、centos7下引导windows10 当在win10系统下安装centos7系统后进入centos系统需要引导windows10开机启动项。 1、打开terminal,输入命令vi /boot/grub2/grub2.cfg 编辑开机引导文件。 2、在 70 行左右的 ### END /etc/grub.d/00 header 和 ### BEGIN /etc/grub.d/10_linux ### 间添加 menuentry ‘Windows10’{ set root = (hd0,1) chainloader +1 } 表示 Windows7 的引导设备为第 1块磁盘的第 1 个分区,根据实际情况填,如果不知道输入命令lsblk查看,或者试几次,如果不正确的话开机选择win10后会报错。 4、重启reboot,即可看到开机引导项。 二、windows10下引导linux 当在centos7系统下安装win10系统后进入win10系统需要引导centos开机启动项。 1、下载并安装EasyBCD开机引导软件,软件很小,功能很强大。如果懒得 百度下,附上百度云下载链接https://pan.baidu.com/s/1-yF3s1fmumnE06_NV2rUYg 2、打开easybcd,点击添加新条目,选择linux,类型选择GRUN2,名称随便写,就是你开机引导显示的名称,然后点击驱动器选择你linux安装的分区,如果不知道,方法同上可以多试几次,点击添加条目,即可添加成功。 centos7 与windows10之间的开机引导 3、最重要的一点,添加成功后点击编辑引导菜单选择倒计时那一项然后点击保存设置,时间自己定,我上次就是没看自动选择的跳过菜单而导致重启n次也显示不出启动项。 from:https://blog.csdn.net/qq_37671523/article/details/102161216
View DetailsLinux下查看CPU型号,内存大小,硬盘空间的命令(详解)
|
1 2 3 4 5 6 7 8 9 10 11 12 13 14 15 16 17 18 19 20 21 22 23 24 25 26 27 28 29 30 31 32 33 34 35 36 37 38 39 40 41 42 43 44 45 46 47 48 49 50 51 52 53 54 55 56 57 58 59 60 61 62 63 64 65 66 67 68 69 70 71 72 73 74 75 76 77 78 79 80 81 82 83 84 85 86 87 88 89 90 91 92 93 94 95 96 97 98 99 100 101 102 103 104 105 106 107 108 109 110 111 112 113 114 115 116 117 118 119 120 121 122 123 124 125 126 127 128 129 130 131 132 133 134 135 136 137 138 139 140 141 142 143 144 145 146 147 148 149 150 151 152 153 154 155 156 157 158 159 160 161 162 163 164 165 166 167 168 169 170 171 172 173 174 175 176 177 178 179 180 181 182 183 184 185 186 187 188 189 190 191 192 193 194 195 196 197 198 199 200 201 202 203 204 205 206 207 208 209 210 211 212 213 214 215 |
# dmidecode |grep -A16 "Memory Device$" Memory Device Array Handle: 0x1000 Error Information Handle: Not Provided Total Width: 72 bits Data Width: 64 bits Size: 2048 MB //1条2G内存 Form Factor: DIMM Set: 1 Locator: DIMM1 Bank Locator: Not Specified Type: DDR2 Type Detail: Synchronous Speed: 667 MHz Manufacturer: 7F7F7F7F7F510000 Serial Number: 0403E324 Asset Tag: 450721 Part Number: 72T256220HR3SA -- Memory Device Array Handle: 0x1000 Error Information Handle: Not Provided Total Width: 72 bits Data Width: 64 bits Size: 2048 MB //1条2G内存 Form Factor: DIMM Set: 1 Locator: DIMM2 Bank Locator: Not Specified Type: DDR2 Type Detail: Synchronous Speed: 667 MHz Manufacturer: 7F7F7F7F7F510000 Serial Number: 0403E324 Asset Tag: 450721 Part Number: 72T256220HR3SA -- Memory Device Array Handle: 0x1000 Error Information Handle: Not Provided Total Width: 72 bits Data Width: 64 bits Size: No Module Installed //1个内存空槽 Form Factor: DIMM Set: 2 Locator: DIMM3 Bank Locator: Not Specified Type: DDR2 Type Detail: Synchronous Speed: Unknown Manufacturer: Serial Number: Asset Tag: Part Number: -- Memory Device Array Handle: 0x1000 Error Information Handle: Not Provided Total Width: 72 bits Data Width: 64 bits Size: No Module Installed //1个内存空槽 Form Factor: DIMM Set: 2 Locator: DIMM4 Bank Locator: Not Specified Type: DDR2 Type Detail: Synchronous Speed: Unknown Manufacturer: Serial Number: Asset Tag: Part Number: -- Memory Device Array Handle: 0x1000 Error Information Handle: Not Provided Total Width: 72 bits Data Width: 64 bits Size: No Module Installed //1个内存空槽 Form Factor: DIMM Set: 3 Locator: DIMM5 Bank Locator: Not Specified Type: DDR2 Type Detail: Synchronous Speed: Unknown Manufacturer: Serial Number: Asset Tag: Part Number: -- Memory Device Array Handle: 0x1000 Error Information Handle: Not Provided Total Width: 72 bits Data Width: 64 bits Size: No Module Installed //1个内存空槽 Form Factor: DIMM Set: 3 Locator: DIMM6 Bank Locator: Not Specified Type: DDR2 Type Detail: Synchronous Speed: Unknown Manufacturer: Serial Number: Asset Tag: Part Number: |
感谢有奉献精神的人 转自:https://blog.csdn.net/zhangliao613/article/details/79021606 转自:http://www.jb51.net/article/97157.htm 1 查看CPU 1.1 查看CPU个数 # cat /proc/cpuinfo | grep "physical id" | uniq | wc -l 2 **uniq命令:删除重复行;wc –l命令:统计行数** 1.2 查看CPU核数 # cat /proc/cpuinfo | grep "cpu cores" | uniq cpu cores : 4 1.3 查看CPU型号 # cat /proc/cpuinfo | grep 'model name' |uniq model name : Intel(R) Xeon(R) CPU E5630 @ 2.53GHz 总结:该服务器有2个4核CPU,型号Intel(R) Xeon(R) CPU E5630 @ 2.53GHz 2 查看内存 2.1 查看内存总数 #cat /proc/meminfo | grep MemTotal MemTotal: 32941268 kB //内存32G 下面是一些命令的集合,供参考: uname -a # 查看内核/操作系统/CPU信息的linux系统信息 head -n l /etc/issue # 查看操作系统版本 cat /proc/cpuinfo # 查看CPU信息 hostname # 查看计算机名的linux系统信息命令 lspci -tv # 列出所有PCI设备 lsusb -tv # 列出所有USB设备的linux系统信息命令 lsmod # 列出加载的内核模块 env # 查看环境变量资源 […]
View Detailslinux zip删除指定文件和追加文件
使用zip命令的-d参数即可删除zip包中的特定文件。 示例:假设有test.zip,包含_code(目录)、_code.zip、readme.txt三个文件,现在要删除test.zip中的_code目录,则执行如下命令 zip -d test.zip _code zip -m myfile.zip ./rpm_info.txt 向压缩文件中myfile.zip中添加rpm_info.txt文件 from:https://www.cnblogs.com/jifeng/p/7839248.html
View Detailslinux命令:返回上一次目录
返回上一次目录 有时候千辛万苦进入了一个很深层的目录,一不小心输入了cd并回车,有什么办法快速回到刚才所在的目录呢?对于bash来说,只需要很管理的一个命令: cd – 该命令等同于cd $OLDPWD,关于这一点在bash的手册页(可使用命令man bash访问其手册页)中有介绍:
|
1 |
An argument of - is equivalent to $OLDPWD. |
并且它还会返回上一次目录的物理路径。 from:https://www.cnblogs.com/yixius/articles/6971080.html
View Details解决ssh_exchange_identification:read connection reset by peer 原因
服务器改了密码,试过密码多次后出现:
|
1 |
ssh_exchange_identification: read: Connection reset by peer |
可以通过ssh -v查看连接时详情
|
1 2 3 4 5 6 7 8 9 10 11 12 13 14 |
OpenSSH_6.6.1, OpenSSL 1.0.1k-fips 8 Jan 2015 debug1: Reading configuration data /etc/ssh/ssh_config debug1: /etc/ssh/ssh_config line 56: Applying options for * debug1: Connecting to xxx [xx] port 22. debug1: Connection established. debug1: identity file /home/yanue/.ssh/id_rsa type -1 debug1: identity file /home/yanue/.ssh/id_rsa-cert type -1 debug1: identity file /home/yanue/.ssh/id_dsa type -1 debug1: identity file /home/yanue/.ssh/id_dsa-cert type -1 debug1: identity file /home/yanue/.ssh/id_ecdsa type -1 debug1: identity file /home/yanue/.ssh/id_ecdsa-cert type -1 debug1: identity file /home/yanue/.ssh/id_ed25519 type -1 debug1: identity file /home/yanue/.ssh/id_ed25519-cert type -1 ........ |
最后找打解决方法:
|
1 |
vi /etc/hosts.allow |
追加:
|
1 |
sshd: ALL |
重启ssh就ok了
|
1 |
service sshd restart |
from:https://www.cnblogs.com/taoquns/p/9590960.html
View Details如何重启 Windows 10 子系统(WSL) ubuntu
WSL 子系统是基于 LxssManager 服务运行的。 只需要将 LxssManager 重启即可。 可以做成一个 bat 文件。 net stop LxssManager net start LxssManager from:https://www.cnblogs.com/F4NNIU/p/10015183.html
View DetailsUbuntu16.04 远程桌面连接(VNC)
1、查看我的Ubuntu系统版本 2、客户机win10下载vnc viewer安装: 下载地址:https://download.csdn.net/download/qq_28284093/10387251 点击打开链接 官网:https://www.realvnc.com/en/connect/download/viewer/ 或者直接可以去官网下载 安装后如下: 3、配置被连接的阿里云服务器 (1)先更新下系统软件
|
1 |
sudo apt-<span class="hljs-keyword">get</span> update |
(2)安装VNC服务
|
1 |
sudo apt-get install vnc4server |
(3)启动vnc服务
|
1 |
vncserver |
需要设置密码(密码后面要用到,要记住哦),密码设置完成,服务启动: 这里,可以使用以下两个命令来增加进程和结束进程:
|
1 |
<span class="hljs-selector-tag">vncserver</span> <span class="hljs-selector-pseudo">:2</span> |
|
1 |
vncserver -<span class="hljs-keyword">kill</span>: <span class="hljs-number">2</span> |
(4)windows下启动vnc viewer客户端,并输入服务器ip+:进程 例如:120.88.88.120:1(注意是输入英文) 点击继续,会提示输入密码,这个时候就输入在步骤3设置的密码,连接成功,因为没有配置图形化界面,所以不太美观,出现下图所示: (5)配置图形界面,安装gnome桌面
|
1 |
sudo apt-get <span class="hljs-keyword">install</span> gnome-panel gnome-<span class="hljs-keyword">settings</span>-daemon metacity nautilus gnome-terminal |
(6)修改vnc的启动文件
|
1 |
vim ~<span class="hljs-regexp">/.vnc/</span>xstartup |
修改里面的内容如下,使用vim编辑器,i进入编辑: #!/bin/sh #Uncomment the following two lines for normal desktop: export XKL_XMODMAP_DISABLE=1 unset SESSION_MANAGER #exec /etc/X11/xinit/xinitrc unset DBUS_SESSION_BUS_ADDRESS gnome-panel & gnome-settings-daemon & metacity & nautilus & gnome-terminal & ESC退出编辑,:wq保存。 (7)安装桌面环境 安装x-window的基础:
|
1 |
sudo apt-get <span class="hljs-keyword">install</span> x-window-<span class="hljs-keyword">system</span>-core |
安装登陆管理器:
|
1 |
sudo apt-<span class="hljs-keyword">get</span> install gdm |
安装ubuntu桌面:
|
1 |
sudo apt-<span class="hljs-keyword">get</span> install ubuntu-desktop |
选择OK 任意选择,点击ok。(我选择第一个,简单介绍一下:gdm是标准桌面,lightdm是轻量桌面),安装过程会持续一段时间。 (8)安装完成之后,杀掉进程,创建进程再次连接: (9)调整分辨率,方便操作
|
1 2 |
vim /usr/bin/vncserver |
修改下面这一行: 再来看看效果,比刚才好多了 各位大神要是有好的意见或者建议,欢迎留言~~~~~
View Details