Daily Archives: 2020年4月21日
WEBAPI 返回一个html页面
public HttpResponseMessage getHtml() { string uri = "http://docs.google.com/gview?embedded=true&url=www.pdf995.com/samples/pdf.pdf"; WebClient wc = new WebClient(); Stream resStream = wc.OpenRead(uri); StreamReader sr = new StreamReader(resStream, System.Text.Encoding.Default); string ContentHtml = sr.ReadToEnd(); var response = new HttpResponseMessage(); response.Content = new StringContent(ContentHtml); response.Content.Headers.ContentType = new MediaTypeHeaderValue("text/html"); return response; } ———————————————— 版权声明:本文为CSDN博主「小咪蜂」的原创文章,遵循 CC 4.0 BY-SA 版权协议,转载请附上原文出处链接及本声明。 原文链接:https://blog.csdn.net/xiaomifengmaidi1/java/article/details/84665109
View DetailsASP.NET Web API实现简单的文件下载与上传
ASP.NET Web API实现简单的文件下载与上传。首先创建一个ASP.NET Web API项目,然后在项目下创建FileRoot目录并在该目录下创建ReportTemplate.xlsx文件,用于下面示例的使用。 1、文件下载 示例:实现报表模板文件下载功能。 1.1 后端代码
|
1 2 3 4 5 6 7 8 9 10 11 12 13 14 15 16 17 18 19 20 21 22 |
/// <summary> /// 下载文件 /// </summary> [HttpGet] public HttpResponseMessage DownloadFile() { string fileName = "报表模板.xlsx"; string filePath = HttpContext.Current.Server.MapPath("~/") + "FileRoot\\" + "ReportTemplate.xlsx"; FileStream stream = new FileStream(filePath, FileMode.Open); HttpResponseMessage response = new HttpResponseMessage(HttpStatusCode.OK); response.Content = new StreamContent(stream); response.Content.Headers.ContentType = new MediaTypeHeaderValue("application/octet-stream"); response.Content.Headers.ContentDisposition = new ContentDispositionHeaderValue("attachment") { FileName = HttpUtility.UrlEncode(fileName) }; response.Headers.Add("Access-Control-Expose-Headers", "FileName"); response.Headers.Add("FileName", HttpUtility.UrlEncode(fileName)); return response; } |
1.2 前端代码
|
1 |
<a href="http://localhost:51170/api/File/DownloadFile">下载模板</a> |
2、文件上传 示例:实现上传报表文件功能。 2.1 后端代码
|
1 2 3 4 5 6 7 8 9 10 11 12 13 14 15 16 17 18 19 20 21 22 23 24 25 26 27 28 29 30 31 32 |
/// <summary> /// 上传文件 /// </summary> [HttpPost] public HttpResponseMessage UploadFile() { try { //获取参数信息 HttpContextBase context = (HttpContextBase)Request.Properties["MS_HttpContext"]; HttpRequestBase request = context.Request; //定义传统request对象 string monthly = request.Form["Monthly"]; //获取请求参数:月度 string reportName = request.Form["ReportName"]; //获取请求参数:报表名称 //保存文件 string fileName = String.Format("{0}_{1}.xlsx", monthly, reportName); string filePath = HttpContext.Current.Server.MapPath("~/") + "FileRoot\\" + fileName; request.Files[0].SaveAs(filePath); //返回结果 var result = new HttpResponseMessage { Content = new StringContent("上传成功", Encoding.GetEncoding("UTF-8"), "application/json") }; return result; } catch (Exception ex) { throw ex; }; } |
2.2 前端代码
|
1 2 3 4 5 6 |
<form action='http://localhost:51170/api/File/UploadFile' method="post" enctype="multipart/form-data"> 报表月份:<input type="text" name="Monthly" value="2018-11" /><br /> 报表名称:<input type="text" name="ReportName" value="财务报表" /><br /> 报表文件:<input type="file" name="file" /><br /> <input type="submit" value="提交" /> </form> |
from:https://blog.csdn.net/pan_junbiao/article/details/84065952
View Details各种文件对应的MIMEType
由上可见,MIME_MapTable是所有文件的后缀名所对应的MIME类型的一个String数组: Java代码 final String[][] MIME_MapTable={ //{后缀名,MIME类型} {".3gp", "video/3gpp"}, {".apk", "application/vnd.android.package-archive"}, {".asf", "video/x-ms-asf"}, {".avi", "video/x-msvideo"}, {".bin", "application/octet-stream"}, {".bmp", "image/bmp"}, {".c", "text/plain"}, {".class", "application/octet-stream"}, {".conf", "text/plain"}, {".cpp", "text/plain"}, {".doc", "application/msword"}, {".docx", "application/vnd.openxmlformats-officedocument.wordprocessingml.document"}, {".xls", "application/vnd.ms-excel"}, {".xlsx", "application/vnd.openxmlformats-officedocument.spreadsheetml.sheet"}, {".exe", "application/octet-stream"}, {".gif", "image/gif"}, {".gtar", "application/x-gtar"}, {".gz", "application/x-gzip"}, {".h", "text/plain"}, {".htm", "text/html"}, {".html", "text/html"}, {".jar", "application/java-archive"}, {".java", "text/plain"}, {".jpeg", "image/jpeg"}, {".jpg", "image/jpeg"}, {".js", "application/x-javascript"}, {".log", "text/plain"}, {".m3u", "audio/x-mpegurl"}, {".m4a", "audio/mp4a-latm"}, {".m4b", "audio/mp4a-latm"}, {".m4p", "audio/mp4a-latm"}, {".m4u", "video/vnd.mpegurl"}, {".m4v", "video/x-m4v"}, {".mov", "video/quicktime"}, {".mp2", "audio/x-mpeg"}, {".mp3", "audio/x-mpeg"}, {".mp4", "video/mp4"}, {".mpc", "application/vnd.mpohun.certificate"}, {".mpe", "video/mpeg"}, {".mpeg", "video/mpeg"}, {".mpg", "video/mpeg"}, {".mpg4", "video/mp4"}, {".mpga", "audio/mpeg"}, {".msg", "application/vnd.ms-outlook"}, {".ogg", "audio/ogg"}, {".pdf", "application/pdf"}, {".png", "image/png"}, {".pps", "application/vnd.ms-powerpoint"}, {".ppt", "application/vnd.ms-powerpoint"}, {".pptx", "application/vnd.openxmlformats-officedocument.presentationml.presentation"}, {".prop", "text/plain"}, {".rc", "text/plain"}, {".rmvb", "audio/x-pn-realaudio"}, {".rtf", "application/rtf"}, {".sh", "text/plain"}, {".tar", "application/x-tar"}, {".tgz", "application/x-compressed"}, {".txt", "text/plain"}, {".wav", "audio/x-wav"}, {".wma", "audio/x-ms-wma"}, {".wmv", "audio/x-ms-wmv"}, {".wps", "application/vnd.ms-works"}, {".xml", "text/plain"}, {".z", "application/x-compress"}, {".zip", "application/x-zip-compressed"}, {"", "*/*"} }; ———————————————— 版权声明:本文为CSDN博主「零下忆度」的原创文章,遵循 CC 4.0 BY-SA 版权协议,转载请附上原文出处链接及本声明。 原文链接:https://blog.csdn.net/sinat_30474567/java/article/details/53411146
View Details
解决postMessage跨域问题
在HTML5中新增了postMessage方法,postMessage可以实现跨文档消息传输(Cross Document Messaging),Internet Explorer 8, Firefox 3, Opera 9, Chrome 3和 Safari 4都支持postMessage。 该方法可以通过绑定window的message事件来监听发送跨文档消息传输内容。 1. postMessage是HTML5 XMLHttpRequest Level 2中的API,且是为数不多可以跨域操作的window属性之一,它可用于解决以下方面的问题: a.) 页面和其打开的新窗口的数据传递 b.) 多窗口之间消息传递 c.) 页面与嵌套的iframe消息传递 d.) 上面三个场景的跨域数据传递 2. postMessage用法:
|
1 |
postMessage(data,origin)方法接受两个参数 |
参数说明: data: html5规范支持任意基本类型或可复制的对象,但部分浏览器只支持字符串,所以传参时最好用JSON.stringify()序列化。 origin: 协议+主机+端口号,也可以设置为"*",表示可以传递给任意窗口,如果要指定和当前窗口同源的话设置为"/"。 举例说明: 两个页面之间进行数据传输,postMessage示例: 我启动了两个ip地址来代表不同域名,页面t_hotnotes_list.html插入如下代码
|
1 2 3 4 5 6 7 8 9 10 11 12 13 14 15 16 17 18 19 |
<iframe id="iframe" src="http://10.73.154.73:8088/rbc/t/search_role.html" style="display:none;"></iframe> <script> var iframe = document.getElementById('iframe'); iframe.onload = function() { var data = { name: 'aym', type:'wuhan' }; // 向domain2传送跨域数据 iframe.contentWindow.postMessage(JSON.stringify(data), 'http://10.73.154.73:8088'); }; // 接受domain2返回数据,这边给延迟的原因,因为同步传输时,页面不一定立马拿到数据,所以给延迟 setTimeout(function(){ window.addEventListener('message', function(e) { alert('data from domain2 sss ---> ' + e.data); }, false); },10) </script> |
页面search_role.html插入如下代码:
|
1 2 3 4 5 6 7 8 9 10 11 12 13 14 15 16 |
<script> // 接收domain1的数据 window.addEventListener('message', function(e) { console.log(e.data); var data = JSON.parse(e.data); if (data) { data.number = 16; data.age = 89; data.icon = 'sfafdafdafasdf'; // 处理后再发回domain1 window.parent.postMessage(JSON.stringify(data), 'http://10.73.154.72:8088'); } }, false); </script> |
当两个服务启动之后,我们在浏览器中打开页面t_hotnotes_list.html
|
1 |
http://10.73.154.72:8088/rbc/t/t_hotnotes_list.html |
得到如下图结果,t_hotnotes_list.html得到两个页面的数据 from:https://www.cnblogs.com/yyy6/p/9481671.html
View Details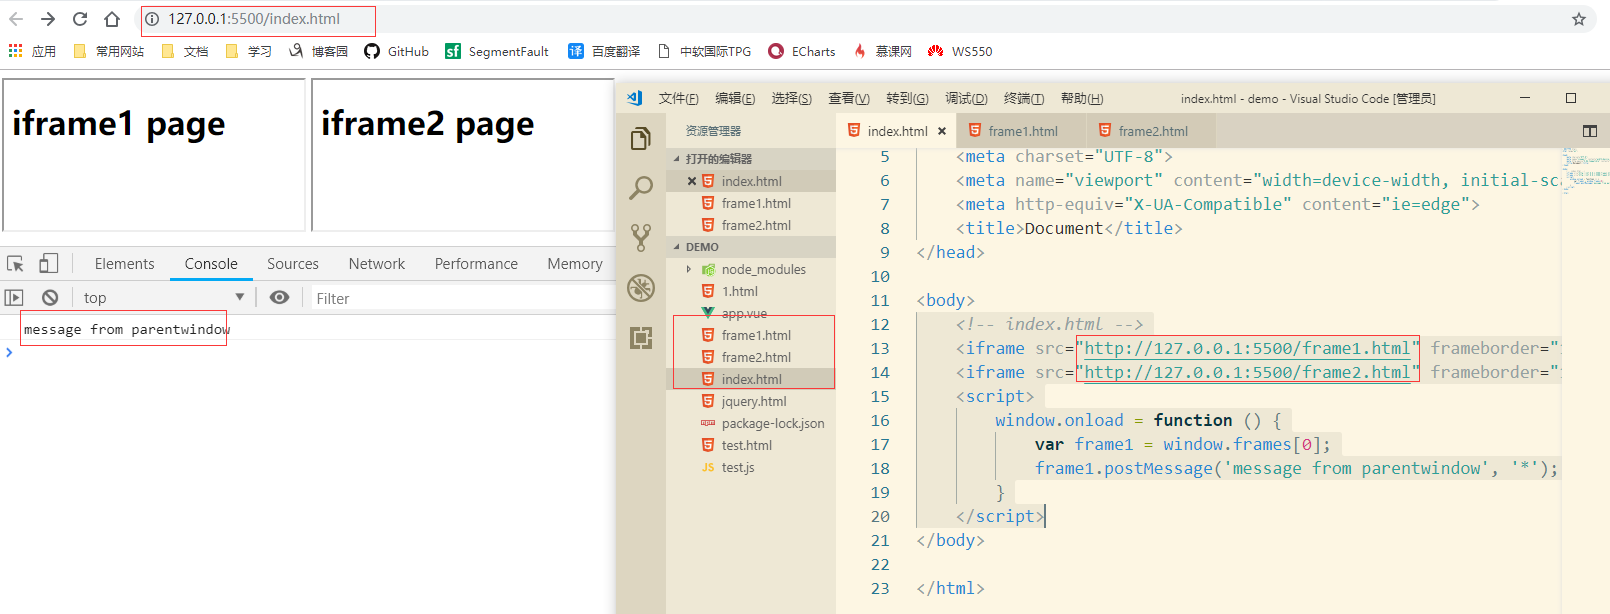
postMessage的使用
一、简介# 1、postMessage()方法允许来自不同源的脚本采用异步方式进行有限的通信,可以实现跨文本档、多窗口、跨域消息传递 2、postMessage(data,origin)方法接受两个参数: (1)data:要传递的数据,html5规范中提到该参数可以是JavaScript的任意基本类型或可复制的对象,然而并不是所有浏览器都做到了这点儿,部分浏览器只能处理字符串参数,所以我们在传递参数的时候需要使用JSON.stringify()方法对对象参数序列化,在低版本IE中引用json2.js可以实现类似效果, (2)origin:字符串参数,指明目标窗口的源,协议+主机+端口号[+URL],URL会被忽略,所以可以不写,这个参数是为了安全考虑,postMessage()方法只会将message传递给指定窗口,当然如果愿意也可以建参数设置为"*",这样可以传递给任意窗口,如果要指定和当前窗口同源的话设置为"/"; 二、使用# 1、子页面向父页面传递消息 <!-- frame1.html --> <h1>iframe1 page</h1> <script> window.top.postMessage('message from iframe1'); </script> 2、父页面向子页面传递消息
|
1 2 3 4 5 6 7 8 9 |
<!-- index.html --> <iframe src="http://127.0.0.1:5500/frame1.html" frameborder="1"></iframe> <iframe src="http://127.0.0.1:5500/frame2.html" frameborder="1"></iframe> <script> window.onload = function () { var frame1 = window.frames[0]; frame1.postMessage('message from parentwindow', '*'); } </script> |
|
1 2 3 4 5 6 7 |
<!-- frame1.html --> <h1>iframe1 page</h1> <script> window.addEventListener('message',function(e){ console.log(e.data) },false) </script> |
from:https://www.cnblogs.com/EricZLin/p/10534537.html
View Details