解析利用wsdl.exe生成webservice代理类的详解
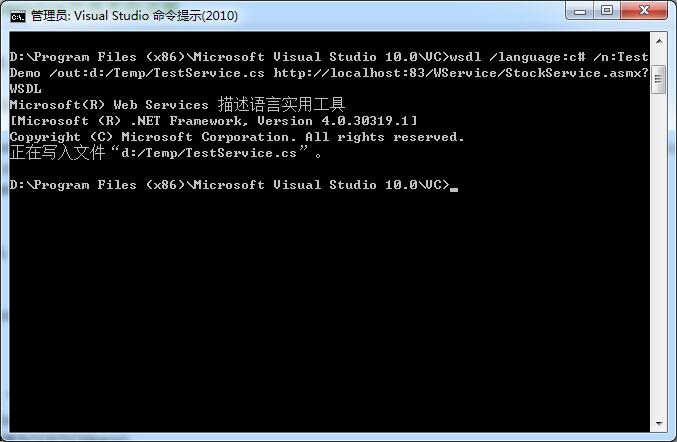
利用wsdl.exe生成webservice代理类: 根据提供的wsdl生成webservice代理类 1、开始->程序->Visual Studio 2010 命令提示 2、输入如下红色标记部分 D:/Program Files/Microsoft Visual Studio 8/VC>wsdl /language:c# /n:TestDemo /out:d:/Temp/TestService.cs D:/Temp/TestService.wsdl 在d:/Temp下就会产生一个TestService.cs 文件 注意:D:/Temp/TestService.wsdl 是wsdl路径,可以是url路径:http://localhost/Temp/Test.asmx?wsdl wsdl参数说明: wsdl.exe <选项> <URL 或路径> <URL 或路径> … – 选项 – <URL 或路径> – 指向 WSDL 协定、XSD 架构或 .discomap 文档的 URL 或路径。 /nologo 取消显示版权标志。 /language:<language> 用于生成的代理类的语言。请从“CS”、“VB”、“JS”、“VJS”、 “CPP”中选择,或者为实现 System.CodeDom.Compiler.CodeDomProvider 的类提供一个完全限定的名称。默认语言为“CS”(CSharp)。 缩写形式为“/l:”。 /sharetypes 打开类型共享功能。此功能针对不同服务之间共享 的相同类型(命名空间、名称和网络签名必须相同) 创建一个具有单一类型定义的代码文件。 请使用 http:// URLs 作为命令行参数来引用 服务,或为本地文件创建一个 discomap 文档。 /verbose 指定 /sharetypes 开关时显示额外信息。 缩写形式为“/v”。 /fields 生成字段而非属性。缩写形式为“/f”。 /order 为粒子成员生成显式顺序标识符。 /enableDataBinding 在所有生成的类型上实现 INotifyPropertyChanged 接口, 以启用数据绑定。缩写形式为“/edb”。 /namespace:<namespace> 生成的代理或模板的命名空间。默认命名空间 为全局命名空间。缩写形式为“/n:”。 /out:<fileName|directoryPath> 生成的代理代码的文件名或目录路径。默认文件名是从 […]
View DetailsGDI+中发生一般性错误的解决办法
前言: 今天在做二维码需求的时候,代码运行的时候报的:GDI+中发生一般性错误的解决办法这个错误,这个错误也是第一次遇到,不知道怎么解决,以为是生成二维码的代码错了。最后通过对代码的检查以及查资料进行解决了,原来是少了一个保存二维码图片的文件夹。 这个错误也常在在后台生成图片以及验证码中出现。基本上都是采用下面的几种解决办法 代码中没有物理的文件夹的解决办法: 在调用 Save 方法之前,先判断保存图片的文件夹是否存在,若不存在,则创建,当然也可以手动添加一个
|
1 2 3 4 |
//dirpath:文件路径 if (!Directory.Exists(dirpath)){ Directory.CreateDirectory(dirpath) } |
有保存图片的物理文件夹的解决办法: 给相应的文件夹赋予 NETWORK SERVICE 帐户以写权限 保存的文件已存在并因某种原因被锁定的解决办法: 重启IIS,解除锁定。并在代码中使用 using 语句,确保释放 Image 对象所使用的所有资源 ———————————————— 版权声明:本文为CSDN博主「小灰灰城堡」的原创文章,遵循 CC 4.0 BY-SA 版权协议,转载请附上原文出处链接及本声明。 原文链接:https://blog.csdn.net/GreyCastle/article/details/88411697
View Detailsnginx上传大文件,413错误解决
在nginx里增加了配置。
|
1 2 3 4 |
client_max_body_size 500m; proxy_connect_timeout 600; proxy_read_timeout 600; proxy_send_timeout 600; |
我觉得,应该只用修改client_max_body_size就可以解决问题。 其它几个,设置了并未起作用。其参数意义如下: client_max_body_size 限制请求体的大小,若超过所设定的大小,返回413错误。 client_header_timeout 读取请求头的超时时间,若超过所设定的大小,返回408错误。 client_body_timeout 读取请求实体的超时时间,若超过所设定的大小,返回413错误。 proxy_connect_timeout http请求无法立即被容器(tomcat, netty等)处理,被放在nginx的待处理池中等待被处理。此参数为等待的最长时间,默认为60秒,官方推荐最长不要超过75秒。 proxy_read_timeout http请求被容器(tomcat, netty等)处理后,nginx会等待处理结果,也就是容器返回的response。此参数即为服务器响应时间,默认60秒。 proxy_send_timeout http请求被服务器处理完后,把数据传返回给Nginx的用时,默认60秒。 from:https://www.cnblogs.com/aguncn/p/11189159.html
View DetailsES6 同步和异步、Promise
一.同步与异步 1. Promise作用:解决异步回调的问题 二.Promise对象 目的:创建异步对象,当异步对象中的异步操作执行完之后,再执行想要执行的东西。 1. resolve 表示将状态变成成功完成,reject 表示将状态变成失败完成。 2. 当resolve方法执行完成之后,再执行then方法。
|
1 2 3 4 5 6 7 8 9 10 |
let p = new Promise((resolve,reject)=>{ setTimeout(()=>{ console.log('执行完毕!'); resolve(); //表示完成 },3000) }); p.then(()=>{ console.log('promise异步操作完成了'); }); |
三.Promise传参 resolve里的参数可以传给then
|
1 2 3 4 5 6 7 8 9 10 |
let p = new Promise((resolve,reject)=>{ setTimeout(()=>{ //console.log('脱完衣服'); resolve(3); },3000) }); p.then((d)=>{ console.log('去洗'+d+'件衣服'); }); -->打印去洗3件衣服 |
四.Promise错误处理 1. reject中存储错误处理的参数,可以传给then方法中的第二个参数
|
1 2 3 4 5 6 7 8 9 10 11 12 |
let p = new Promise((resolve,reject)=>{ setTimeout(()=>{ //resolve('读写成功'); reject('读写失败'); },2000) }); p.then((d)=>{ console.log('执行成功'); },(err)=>{ console.log(err); }); -->读写失败 |
五.Promise.all()-->一个脚本中有多个promise时,监控多个Promise对象执行完成 1.Promise.all([p1,p2,p3]):把promise打包,扔到一个数组里面,打包完还是一个promise对象.
|
1 2 3 4 5 6 7 8 9 10 11 12 13 14 15 16 17 18 19 |
let p1 = new Promise((resolve,reject)=>{ let time = Math.random()*4000+1000; setTimeout(()=>{ console.log('p1完成'); resolve(); },time) }); let p2 = new Promise((resolve,reject)=>{ let time = Math.random()*4000+1000; setTimeout(()=>{ console.log('p2完成'); resolve(); },time) }); let p = Promise.all([p1,p2)]; p.then(()=>{ console.log(全部执行完毕); }) -->p1和p2全部执行完毕后,才会执行p.then方法里的操作 |
必须确保所有promise对象都是resolve状态 输出["aaaa","bbbb","cccc"] 六. 1.Promise对象的then方法有两个参数,一个是成功后的参数,另一个是失败的参数方法 promise.then(success,fail) 失败鸟 2.new Promise().catch()-->错误捕获 等同于上面的reject,返回“失败鸟” 也可这样使用 七.Promise的方法 1.Promise.resolve('xxx'):将现有的东西,转成一个Promise对象,且是resolve成功状态 输出aaa 等价于下面这句话 2.Promise.reject('xxx'):将现有的东西,转成一个Promise对象,且是reject失败状态 输出aaaa 4.Promise.race():与all的不同之处在于,只要有一个是resolve状态就可以返回 输出aaaa 八. 作者:祝名 链接:https://www.jianshu.com/p/7b1dd9c50d2b 来源:简书 著作权归作者所有。商业转载请联系作者获得授权,非商业转载请注明出处。
View Detailsjavascript的urlencode
今天在一个原来使用AJAX自动缩小选择内容的项目上突然发现当输入名称时,如果输入有特殊字符&的时候,选择的内容不会发生变化,也就是说输入的内容在&后面的内容会被截断,经过查证才发现在客户端使用AJAX发送获取到客户端数据的时候,数据内容是没有经过url编码的就是直接放在url地址上发送了,因为当时考虑到输入的是公司名称,一般不会有特殊字符,也没认真考虑,使用当输入特殊字符&的时候后面的内容就会被截断。解决办法是对要发送的内容进行url编码,可以使用如下javascript函数: escape(),encodeURI(),以及encodeURIComponent()。这几种编码所起的作用各不相同。 escape() 方法: 采用ISO Latin字符集对指定的字符串进行编码。所有的空格符、标点符号、特殊字符以及其他非ASCII字符都将被转化成%xx格式的字符编码(xx等于该字符在字符集表里面的编码的16进制数字)。比如,空格符对应的编码是%20。 不会被此方法编码的字符: @ * / + encodeURI() 方法: 把URI字符串采用UTF-8编码格式转化成escape格式的字符串。 不会被此方法编码的字符:! @ # $& * ( ) = : / ; ? + ' encodeURIComponent() 方法: 把URI字符串采用UTF-8编码格式转化成escape格式的字符串。与encodeURI()相比,这个方法将对更多的字符进行编码,比如 / 等字符。所以如果字符串里面包含了URI的几个部分的话,不能用这个方法来进行编码,否则 / 字符被编码之后URL将显示错误。 不会被此方法编码的字符:! * ( ) ' 因此,对于中文字符串来说,如果不希望把字符串编码格式转化成UTF-8格式的(比如原页面和目标页面的charset是一致的时候),只需要使用 escape。如果你的页面是GB2312或者其他的编码,而接受参数的页面是UTF-8编码的,就要采用encodeURI或者 encodeURIComponent。 另外,encodeURI/encodeURIComponent是在javascript1.5之后引进的,escape则在javascript1.0版本就有。 本文来自CSDN博客,转载请标明出处:http://blog.csdn.net/nich262/archive/2008/11/03/3208573.aspx from:https://www.cnblogs.com/seasons1987/p/3357775.html
View Details解决win2008下IIS7的HTTP500错误
造成500错误常见原因有:ASP语法出错、ACCESS数据库连接语句出错、文件引用与包含路径出错、使用了服务器不支持的组件如FSO等。 另外,对于win2008的IIS默认不显示详细出错信息的问题以下就是重点部分了,2008默认它是不会显示详细错误的。 1.打开IIS,点全局设置中的"错误页"(注意必须是全局网站!) 2.右击500错误这一行,单击 “编辑功能设置”. 2.在错误响应中,选第二项的"详细错误" 3.点确定后刷新IE就会显示详细的出错信息. 值得注意的地方:这样设置了,就不能给500内部错误自定义错误页面了。 from:https://blog.csdn.net/lishimin1012/article/details/72956068
View DetailsGit查看与修改用户名、邮箱
用户名和邮箱的作用: 用户名和邮箱地址相当于你的身份标识,是本地Git客户端的一个变量,不会随着Git库而改变。 每次commit都会用用户名和邮箱纪录。 github的contributions跟你的邮箱是有关联的。 查看自己的用户名和邮箱地址: $ git config user.name $ git config user.email 修改自己的用户名和邮箱地址: $ git config --global user.name "xxx" $ git config --global user.email "xxx" from:https://www.cnblogs.com/lxwphp/p/10619618.html
View Detailsmac 重启php-fpm
查看php-fpm端口是否在被php-fpm使用
|
1 |
sudo lsof -i:9000 |
一般修改 php.ini 文件后经常需要重启php-fpm
|
1 |
sudo killall php-fpm // 关闭 |
再输入 sudo lsof -i:9000 就会发现php-fpm没有打印对应端口
|
1 |
sudo php-fpm // 重启 |
from:https://www.cnblogs.com/cap-rq/p/11460282.html
View Detailsmac 更换brew源
homebrew主要分两部分:git repo(位于GitHub)和二进制bottle(位于binary),这两者在国内访问不太顺畅。其实可以替换成国内的镜像,git repo国内镜像就比较多了,可以自行查找,如:中科大镜像… 替换homebrew默认源 替换brew.git: cd "$(brew --repo)" git remote set-url origin https://mirrors.ustc.edu.cn/brew.git 替换homebrew-core.git: cd "$(brew --repo)/Library/Taps/homebrew/homebrew-core" git remote set-url origin https://mirrors.ustc.edu.cn/homebrew-core.git 如果替换源之后brew update 没反应 cd "$(brew --repo)" git pull origin master 切回官方源 重置brew.git: cd "$(brew --repo)" git remote set-url origin https://github.com/Homebrew/brew.git 重置homebrew-core.git: cd "$(brew --repo)/Library/Taps/homebrew/homebrew-core" git remote set-url origin https://github.com/Homebrew/homebrew-core.g 注释掉bash配置文件里的有关Homebrew Bottles即可恢复官方源。 重启bash或让bash重读配置文件。 替换Homebrew Bottles源 Homebrew Bottles是Homebrew提供的二进制代码包,目前镜像站收录了以下仓库: 对于bash用户 echo 'export HOMEBREW_BOTTLE_DOMAIN=https://mirrors.ustc.edu.cn/homebrew-bottles' >> ~/.bash_profile source ~/.bash_profile 对于zsh用户 echo 'export HOMEBREW_BOTTLE_DOMAIN=https://mirrors.ustc.edu.cn/homebrew-bottles' >> ~/.zshrc source ~/.zshrc from:https://blog.csdn.net/zhazhaji/article/details/80957811
View Detailsnginx开启目录浏览
|
1 2 3 4 5 6 7 8 9 10 11 |
location /download { include /usr/local/nginx/html/Nginx-Fancyindex-Theme/fancyindex.conf; # 目录美化配置 root /home/map/www/; #指定目录所在路径 autoindex on; #开启目录浏览 autoindex_format html; #以html风格将目录展示在浏览器中 autoindex_exact_size off; #切换为 off 后,以可读的方式显示文件大小,单位为 KB、MB 或者 GB autoindex_localtime on; #以服务器的文件时间作为显示的时间 charset utf-8,gbk; #展示中文文件名 } |
View Details