Category Archives: Frontend
ExtJs4发送同步请求的store
ExtJs的store默认是异步的,但有时候我们必须要发送同步请求才能满足需求,比如在多线程中,要实现同步很简单,只需继承Ext.data.proxy.Ajax,重写的同步类如下:
|
1 2 3 4 5 6 7 8 9 10 11 12 13 14 15 16 17 18 19 20 21 22 23 |
Ext.define('Ext.ux.data.proxy.Ajax', { extend: 'Ext.data.proxy.Ajax', async:true, doRequest: function(operation, callback, scope) { var writer = this.getWriter(), request = this.buildRequest(operation); if (operation.allowWrite()) { request = writer.write(request); } Ext.apply(request, { async : this.async, binary : this.binary, headers : this.headers, timeout : this.timeout, scope : this, callback : this.createRequestCallback(request, operation, callback, scope), method : this.getMethod(request), disableCaching: false }); Ext.Ajax.request(request); return request; } }); |
使用的时候,只需修改代理即可,async:false表示同步,true为异步:
|
1 2 3 4 5 6 7 8 |
proxy: Ext.create("Ext.ux.data.proxy.Ajax",{ async:false, url:" ", reader: { type: 'json', root: 'root' } }) |
from:https://my.oschina.net/wangdaoliang/blog/776567
View Detailspromise
promise是什么? 1、主要用于异步计算 2、可以将异步操作队列化,按照期望的顺序执行,返回符合预期的结果 3、可以在对象之间传递和操作promise,帮助我们处理队列 为什么会有promise? 为了避免界面冻结(任务) 同步:假设你去了一家饭店,找个位置,叫来服务员,这个时候服务员对你说,对不起我是“同步”服务员,我要服务完这张桌子才能招呼你。那桌客人明明已经吃上了,你只是想要个菜单,这么小的动作,服务员却要你等到别人的一个大动作完成之后,才能再来招呼你,这个便是同步的问题:也就是“顺序交付的工作1234,必须按照1234的顺序完成”。 异步:则是将耗时很长的A交付的工作交给系统之后,就去继续做B交付的工作,。等到系统完成了前面的工作之后,再通过回调或者事件,继续做A剩下的工作。 AB工作的完成顺序,和交付他们的时间顺序无关,所以叫“异步”。 异步操作的常见语法 事件监听
|
1 2 3 4 5 6 |
document.getElementById('#start').addEventListener('click', start, false); function start() { // 响应事件,进行相应的操作 } // jquery on 监听 $('#start').on('click', start) |
回调
|
1 2 3 4 5 6 7 8 9 10 11 |
// 比较常见的有ajax $.ajax('http://www.wyunfei.com/', { success (res) { // 这里可以监听res返回的数据做回调逻辑的处理 } }) // 或者在页面加载完毕后回调 $(function() { // 页面结构加载完成,做回调逻辑处理 }) |
有了nodeJS之后…对异步的依赖进一步加剧了 大家都知道在nodeJS出来之前PHP、Java、python等后台语言已经很成熟了,nodejs要想能够有自己的一片天,那就得拿出点自己的绝活: 无阻塞高并发,是nodeJS的招牌,要达到无阻塞高并发异步是其基本保障 举例:查询数据从数据库,PHP第一个任务查询数据,后面有了新任务,那么后面任务会被挂起排队;而nodeJS是第一个任务挂起交给数据库去跑,然后去接待第二个任务交给对应的系统组件去处理挂起,接着去接待第三个任务…那这样子的处理必然要依赖于异步操作 异步回调的问题: 之前处理异步是通过纯粹的回调函数的形式进行处理 很容易进入到回调地狱中,剥夺了函数return的能力 问题可以解决,但是难以读懂,维护困难 稍有不慎就会踏入回调地狱 – 嵌套层次深,不好维护 回调地狱 一般情况我们一次性调用API就可以完成请求。 有些情况需要多次调用服务器API,就会形成一个链式调用,比如为了完成一个功能,我们需要调用API1、API2、API3,依次按照顺序进行调用,这个时候就会出现回调地狱的问题 promise promise是一个对象,对象和函数的区别就是对象可以保存状态,函数不可以(闭包除外) 并未剥夺函数return的能力,因此无需层层传递callback,进行回调获取数据 代码风格,容易理解,便于维护 多个异步等待合并便于解决 promise详解
|
1 2 3 4 5 6 7 8 9 10 |
new Promise( function (resolve, reject) { // 一段耗时的异步操作 resolve('成功') // 数据处理完成 // reject('失败') // 数据处理出错 } ).then( (res) => {console.log(res)}, // 成功 (err) => {console.log(err)} // 失败 ) |
resolve作用是,将Promise对象的状态从“未完成”变为“成功”(即从 pending 变为 resolved),在异步操作成功时调用,并将异步操作的结果,作为参数传递出去; reject作用是,将Promise对象的状态从“未完成”变为“失败”(即从 pending 变为 rejected),在异步操作失败时调用,并将异步操作报出的错误,作为参数传递出去。 promise有三个状态: 1、pending[待定]初始状态 2、fulfilled[实现]操作成功 3、rejected[被否决]操作失败 当promise状态发生改变,就会触发then()里的响应函数处理后续步骤; promise状态一经改变,不会再变。 Promise对象的状态改变,只有两种可能: 从pending变为fulfilled 从pending变为rejected。 这两种情况只要发生,状态就凝固了,不会再变了。 最简单示例:
|
1 2 3 4 5 6 7 |
new Promise(resolve => { setTimeout(() => { resolve('hello') }, 2000) }).then(res => { console.log(res) }) |
分两次,顺序执行
|
1 2 3 4 5 6 7 8 9 10 11 12 13 14 |
new Promise(resolve => { setTimeout(() => { resolve('hello') }, 2000) }).then(val => { console.log(val) // 参数val = 'hello' return new Promise(resolve => { setTimeout(() => { resolve('world') }, 2000) }) }).then(val => { console.log(val) // 参数val = 'world' }) |
promise完成后then()
|
1 2 3 4 5 6 7 8 9 10 |
let pro = new Promise(resolve => { setTimeout(() => { resolve('hello world') }, 2000) }) setTimeout(() => { pro.then(value => { console.log(value) // hello world }) }, 2000) |
结论:promise作为队列最为重要的特性,我们在任何一个地方生成了一个promise队列之后,我们可以把他作为一个变量传递到其他地方。 假如在.then()的函数里面不返回新的promise,会怎样? .then() 1、接收两个函数作为参数,分别代表fulfilled(成功)和rejected(失败) 2、.then()返回一个新的Promise实例,所以它可以链式调用 3、当前面的Promise状态改变时,.then()根据其最终状态,选择特定的状态响应函数执行 4、状态响应函数可以返回新的promise,或其他值,不返回值也可以我们可以认为它返回了一个null; 5、如果返回新的promise,那么下一级.then()会在新的promise状态改变之后执行 6、如果返回其他任何值,则会立即执行下一级.then() .then()里面有.then()的情况 1、因为.then()返回的还是Promise实例 2、会等里面的then()执行完,再执行外面的 then嵌套 对于我们来说,此时最好将其展开,也是一样的结果,而且会更好读: 展开增加可读性 错误处理 Promise会自动捕获内部异常,并交给rejected响应函数处理。 第一种错误处理 第一种错误处理 第二种错误处理 第二种错误处理 错误处理两种做法: 第一种:reject('错误信息').then(() […]
View Detailscomponent:(resolve) => require是什么意思?
|
1 2 3 4 5 6 7 8 |
{ // 进行路由配置,规定'/'引入到home组件 path: '/', component: resolve => require(['../pages/home.vue'], resolve), meta: { title: 'home' } }] |
这是异步加载组件,当你访问 / ,才会加载 home.vue。 路由懒加载的一种写法 也可以用import
|
1 2 3 4 5 6 7 |
{ path: '/', component: () => import('../pages/home.vue'), meta: { title: 'home' } } |
vue-router中,require代替import解决vue项目首页加载时间过久的问题 vue的路由配置文件(routers.js),一般使用import引入的写法,当项目打包时路由里的所有component都会打包在一个js中,在项目刚进入首页的时候,就会加载所有的组件,所以导致首页加载较慢, 而用require会将component分别打包成不同的js,按需加载,访问此路由时才会加载这个js,所以就避免进入首页时加载内容过多。 require: 运行时调用,理论上可以运用在代码的任何地方, import:编译时调用,必须放在文件开头 如果使用import方式,还需要安装一个插件 https://blog.csdn.net/hong10086/article/details/89684772 作者:凤箫之舞 链接:https://www.jianshu.com/p/487a600824af 来源:简书 著作权归作者所有。商业转载请联系作者获得授权,非商业转载请注明出处。
View DetailsVue的slot-scope的场景的个人理解
这篇文章不是单纯把文档的话和api拿来翻译和演示,而是谈谈我对于slot-scope的使用场景的个人理解,如果理解错误,欢迎讨论! Vue的插槽slot,分为3种 匿名插槽 具名插槽 作用域插槽 前两种很好理解,无论就是子组件里定义一个slot占位符,父组件调用时,在slot对应的位置填充模板就好了。 作用域插槽的慨念,文档却只有一句简单的描述 有的时候你希望提供的组件带有一个可从子组件获取数据的可复用的插槽。 网络上大多数文章,也是千篇一律的翻译这句话,可是仅凭这一句话,我想象不到slot-scope的使用场景。 前言 介绍了写这篇文章的来由,接下来简述一下本文的脉络 首先,我会结合文档上todo-list的例子,来简单说明一下slot-scope的使用方式 其次,会使用但不理解什么时候用,就没有什么意义,所以本文第二部分,谈一下个人对于其使用场景的理解 最后,是我翻阅网络上关于slot-scope时,看到的一些我觉得不太恰当的案例 官方文档slot-scope的示例 下面是2个父子的vue组件,先解释一下2个组件做了什么事情 父组件仅仅是调用了子组件 子组件内部实现了一个todolist列表 我建议从数据流动的角度,理解插槽作用域的使用方式,(先学会怎么用,暂时不用理解为什么要这么用,使用场景是第二部分) 1.父组件传递了todos数组给子组件 2.子组件通过props接受了数组数据,这里应该没有任何问题 3.子组件拿到数组后v-for渲染列表,并且通过 <slot :todo="todo">的方式,把数组内的每一个todo对象,传递给父组件 4.父组件通过slot-scope="slotProps"的方式,接受todo对象,之后就可以通过slotProps.todo.xxx的方式来使用了 所以数据的流动经历了 父组件传递todos数组给子组件 子组件遍历todos数组,把里面的todo对象传递给父组件 好啦,这就是slot-scope的使用方法,就这么简单,完结撒花~ 我贴出全部代码,方便大家自己研究 父组件的源码,也就是调用者
|
1 2 3 4 5 6 7 8 9 10 11 12 13 14 15 16 17 18 19 20 21 22 23 24 25 26 27 28 29 30 31 32 33 34 35 36 37 38 39 40 41 42 43 44 45 |
<template> <todo-list :todos="todos"> <template slot-scope="slotProps"> <span v-if="slotProps.todo.isComplete">✓</span> <span>{{slotProps.todo.text}}</span> </template> </todo-list> </template> <script> import todoList from './todoList' export default { data () { return { todos: [ { id: 0, text: 'ziwei0', isComplete: false }, { text: 'ziwei1', id: 1, isComplete: true }, { text: 'ziwei2', id: 2, isComplete: false }, { text: 'ziwei3', id: 3, isComplete: false } ] } }, components: { todoList }, } </script> |
子组件源码,也就是封装组件的人
|
1 2 3 4 5 6 7 8 9 10 11 12 13 14 15 16 17 18 |
<template> <ul> <li v-for="todo in todos" :key="todo.id"> <slot :todo="todo"> </slot> </li> </ul> </template> <script> export default { props: { todos: { type: Array } } } </script> |
slot-scope的使用场景的个人理解 想象一个场景: 当你要给同事封装一个列表组件,你就需要使用作用域插槽(注意是列表或者类似列表的组件) 你开发的这个列表组件要如何使用呢? 一般来说作为列表组件的调用者,你的同事先做ajax请求,拿到一个这样的数组
|
1 2 3 4 5 6 7 8 9 10 11 12 13 14 15 16 17 18 19 20 21 22 |
todos: [ { id: 0, text: 'ziwei0', isComplete: false }, { text: 'ziwei1', id: 1, isComplete: true }, { text: 'ziwei2', id: 2, isComplete: false }, { text: 'ziwei3', id: 3, isComplete: false } ] |
之后会把todso传递给列表组件吧,那么列表组件内部做什么事情呢? 列表内部肯定会v-for去帮你的同事渲染这个数组嘛。 就类似element-ui里的table组件一样 问题的关键就在这里 列表组件的循环,是发生在组件内部的,所以通过 v-for="todo in todos" ,列表组件很容易拿到每一项todo,但列表拿到数据没用呀,列表只是一个瓜皮,它又不懂业务逻辑 这个数据是你同事的业务数据,所以这个数据必须得交给组件的调用者,也就是把数据交给你的同事才对。 那么你怎样才能把每一项的todo数据给传递出去呢? 你会发现没有办法! 无论是用$emit、vuex还是localStorage,可以考虑一下,会发现没有合适的时机,能让你把todo传递出去 所以为了应对这个场景下,发明了作用域插槽,列表组件可以通过<slot :todo="todo"></slot>传递todo出去 你的同事可以通过 slot-scope="slotsProps"拿到todo。 回答几个疑问,其实如果你看懂上面的问题,应该可以回答下面的问题。这也是我曾经的疑问 疑问1:一般不是我们传参数来调用组件吗?为什么组件还把数据传递回来?
|
1 2 3 4 5 6 7 |
的确,调用ui组件时一般是我们传递配置参数给他们。 但是就像elemnt-ui的table组件,你把数组传递给table后,是不是有时候需要拿到某一行的row对象 并根据row对象里的字段,来判断一些内容的显示隐藏? 因为循环的过程发生在table组件内部,所以table组件可以方便的获取到每一项数据,但是这些数据最终不是给组件的,而是我们自己要用的业务数据。所以也需要一个方式,让调用者能拿到自己想要的数据 |
疑问2: 既然子组件最终还要把我给他的数据,再返还给我,那我当初还干嘛给它,能不能就自己在父组件里玩?
|
1 2 3 4 5 |
如果你不把数据给子组件当然可以。但是就等于抛弃掉了子组件的封装,只能你直接在父组件自己写一个列表 毕竟你不把数据给子组件,子组件还渲染个锤子?没有父子关系的话,也就不用什么插槽了。 但是咱不是为了封装后,可以复用嘛,总不能永远不用组件嘛 |
疑问3: 父组件需要子组件的数据?那不会有$emit和vuex嘛,为什么要有slot-scope?
|
1 2 3 |
$emit和vuex是数据传递的一种方法,但是你可以尝试用$emit和vuex把todo传递给父组件。 你会发现的确没有合适的钩子、时机来$emit数据 |
一些网上个人认为不太恰当的例子 我认为几种说法是不太恰当的,也是给我造成一些困惑的 slot-scope是什么?就是把子组件的数据传递给父组件的一种方式 这种说法,会让我觉得slot-scope跟emit和vuex是一类东西 在一些例子中,把数据定义在写死在列表组件中,展示如何把数据传递出去 这些举例子的不恰当之处,我觉得是不应该把数据定义在子组件里。 因为真正的使用场景下,子组件的数据都是来自父组件的。作为组件内部应该保持纯净。 就像element-ui里的table组件,肯定不会定义一些数据在组件内部,然后传递给你。 table组件的数据都是来自调用者的,然后table会把每一行的row,在开发者需要时,传递出去。 这些例子虽然不是错误,但是我觉得反而不利于理解slot-scope from:https://segmentfault.com/a/1190000015884505?utm_source=tag-newest
View DetailsVUE基础知识1:数组forEach
vue是数据驱动,vue主要操作的是数据 1、JS中有哪些数据类型 (1)基本数据类型:number,string,boolean,null,undefined (2)引用数据类型: Object, function, Symbol(ES6) 2、{} 和 [] 操作数组的方法有哪些: ES4: pop,push,unshfit,shfit,slice,splice,reverse,sort,indexOf,lastIndexOf,concat (pop push unshift shift splice reverse sort ) 括号中的能改变原数组,叫数组的变异 3、用的比较多的方法 forEach,filter,map,find,some,every,includes,reduce some,every 是 ES5的 ES6:(includes,find),其余都是ES5的 filter(过滤),map(映射) 4、node版本 版本最好升级到 8.5以上 5、for for循环和forEach是等价的,都是循环数组 例子:
|
1 2 3 4 5 6 7 8 9 |
let arr = [1, 2, 3, 4, 5]; for (let i = 0; i < arr.length; i++) { console.log(arr[i]); } |
5、forEach 例子:
|
1 2 3 4 5 6 7 8 9 |
let arr = [1, 2, 3, 4, 5]; arr.forEach(function (item, index) { console.log(item); }); |
注意:forEach不支持return 6、 for of for of 支持return,并且是只能遍历数组,不能遍历对象 for of 是ES6语法 例子:
|
1 2 3 4 5 6 7 8 9 |
let arr = [1, 2, 3, 4, 5]; for(let val of arr) { console.log(val); } |
7、如何用for of 遍历对象呢? 本来for of 不支持遍历对象。 Object.keys将对象的key作为新的数组 例子:
|
1 2 3 4 5 6 7 8 9 |
let obj = {school: 'name', age: 8}; for (let val of Object.keys(obj)) { console.log(obj[val]); } |
8、filter filter是过滤的意思,filter不会操作原数组,返回的是过滤后的新数组。 回调函数返回的结果,如果返回true,表示这一项放到新数组中。 例子: 过滤出来大于2,小于5的值
|
1 2 3 4 5 6 7 8 9 |
let newAry = [1, 2, 3, 4, 5].filter(function (item, index) { //index是索引 return item > 2 && item < 5; }); console.log(newAry); // [3, 4] |
9、map map是映射的意思,将一个数组映射成一个新数组。 map不操作原数组,返回一个新数组。 回调函数中返回什么,这一项就是什么。 例子: [1,2,3] 映射成 <li>1</li><li>2</li><li>3</li>
|
1 2 3 4 5 6 7 8 9 10 11 12 13 14 15 16 17 18 19 20 21 22 23 24 25 26 27 28 29 30 31 |
let arr1 = [1, 2, 3].map(function (item, index) { return 2; }); console.log(arr1); // [2,2,2] let arr2 = [1, 2, 3].map(function (item, index) { return item *= 3; }); console.log(arr2); // [3,6,9] let arr3 = [1, 2, 3].map(function (item, index) { return `<li>${item}</li>`; }); console.log(arr3); // [ '<li>1</li>', '<li>2</li>', '<li>3</li>' ] console.log(arr3.join('')); // <li>1</li><li>2</li><li>3</li> |
join() 方法用于把数组中的所有元素放入一个字符串。 是ES6中的模板字符串,遇到变量用${ } 取值。 filter一般用于删除数组中的某一项。而map一般用于把这个数组修改一下。 10、includes includes 数组是否包含的意思,返回的是boolean includes 是ES6的方法 some、every 是ES5的方法 例子:
|
1 2 3 4 5 |
let arr3 = [1,2,3,4,55]; console.log(arr3.includes(5)); // false |
11、find find 是找出数组中的某一项。 返回找到的那一项。 […]
View Detailsaxios基础用法
概述: 1.axios:一个基于Promise用于浏览器和nodejs的HTTP客户端。本质是对ajax的封装。 特征: 从浏览器中创建XMLHttpRequest 从node.js发出http请求 支持Promise API 拦截请求和响应 转换请求和响应数据 取消请求 自动转换JSON数据 客户端支持防止CSRF/XSRF 2.安装 npm install axios import axios from "axios" 3.API 1 axios(config)
|
1 2 3 4 5 6 7 8 |
eg: axios({ method:"post", url:"/user", data:{ firstName:"nanhua", lastName:"qiushui" } }); |
2.axios(url,config) //默认为get请求 3.请求方法别名
|
1 2 3 4 5 6 7 |
axios.request(config) axios.get(url,config) axios.post(url,data,config) axios.delete(url,config) axios.head(url,config) axios.put(url,data,config) axios.patch(url,data,config) |
4.并发
|
1 2 3 4 5 6 7 8 9 10 11 12 13 14 15 16 17 18 19 20 21 |
自定义配置创建axios实例 var instance = axios.create({ baseURL:"https://some-domain.com/api/", timeout:1000, headers:{"X-Custom-Header":"foobar"} }) 自定义实例默认值 //创建实例时设置 //实例创建后修改默认值(设置全局axios默认值) axios.defaults.baseURL = "https://api.example.com"; axios.defaults.headers.common['Authorization'] = AUTH_TOKEN; axios.defaults.headers.post["Content-Type"] = "application/x-www-form-urlencoded"; 并发:axios.all(iterable) eg: axios.all([ axios.get("https://api.github.com/xxx/1"); axios.get("https://api.github.com/xxx/2"); ]).then(axios.spread(function(userResp,reposResp){ console.log("User",userResp.data); console.log("Repositories",reposResp.data); })) |
|
1 2 |
* 当所有的请求都完成后,会收到一个数组,它包含着响应对象,其中的顺序和请求发送的顺序相同,可以用<span class="hljs-selector-tag">axios</span><span class="hljs-selector-class">.spread</span>分割成多个单独的响应对象。 |
5.config参数
|
1 2 3 4 5 6 7 8 9 10 11 12 13 14 15 16 17 18 19 20 21 22 23 24 25 26 27 28 29 30 31 32 33 34 35 36 37 38 39 40 41 42 43 44 45 46 47 48 49 50 51 52 53 54 55 56 57 58 59 |
baseURL: 'https://some-domain.com/api/', //将自动加在url前面,除非url是一个绝对URL //允许在向服务器发送前,修改请求数据 //只能用在PUT\POST\PATCH //后面数组的函数必须返回一个字符串/ArrayBuffer或Stream transformRequest:[function(data){ //对data进行任意转换处理 return data; }], //在传递给then/catch之前,允许修改响应数据 transformResponse: [function (data) { return data; }], //即将被发送的自定义请求头 headers:{ 'X-Requested-With': 'XMLHttpRequest' }, //即将与请求一起发送的URL参数 params:{ ID: 12345 }, //负责params序列化的函数 paramsSerializer:function(params){ return Qs.stringify(params,{arrayFormat: "brackets"}); }, //超时 timeout: 1000, //表示跨域请求时是否需要使用凭证 withCredentials: false, //允许响应内容的最大尺寸 maxContentLength: 2000, //对打重定向数目 maxRedirects:5, //是否启用长连接 httpAgent: new http.Agent({ keepAlive: true }), httpsAgent: new https.Agent({ keepAlive: true }), //代理服务器设置 proxy:{ host:"127.0.0.1", port: 9000, auth:{ username:"nanhuaqiushui", password:"Huawei@123" } } |
6.响应结构
|
1 2 3 4 5 6 7 |
{ data:{}, status:200, statusText:"OK", headers:{}, //服务器响应的头 config:{} //为请求提供的配置信息 } |
7.拦截器
|
1 2 3 4 5 6 7 8 9 10 11 12 13 14 15 16 17 18 19 20 21 22 |
//请求拦截器 axios.interceptors.request.use(function(config){ //发送请求之前做些什么 return config; },function(error){ //请求错误之后做些什么 return Promise.reject(error); }) //响应添加拦截器 axios.interceptors.response.use(function(config){ //发送请求之前做些什么 return config; },function(error){ //请求错误之后做些什么 return Promise.reject(error); }) //移除拦截器 var myInterceptor = axios.interceptors.request.use(function(){ ... }) axios.interceptors.request.eject(myInterceptor); |
新兴实践
|
1 2 3 4 5 6 7 8 9 10 11 12 13 14 15 16 17 18 19 20 21 22 23 24 25 26 27 28 29 30 31 32 33 34 35 36 37 |
const service = axios.create({ baseURL: process.env.BASE_API, timeout: 100000 }) // 请求拦截器 service.interceptors.request.use( config => { config.headers['Content-Type'] = 'application/json' if (store.getters.token) { // 让每个请求携带token config.headers['Authorization'] = store.getters.token } return config }, error => { Toast.failed('网络异常,请检查网络连接') console.log(error) // for debug return Promise.reject(error) } ) // 响应拦截器 service.interceptors.response.use( response => { const res = response.data if (res.code && res.code !== 200) { Toast.failed(res.message) } return response }, error => { Toast.failed('网络异常,请检查网络连接') return Promise.reject(error) } ) export default service |
from:https://www.cnblogs.com/nanhuaqiushui/p/10514122.html
View Details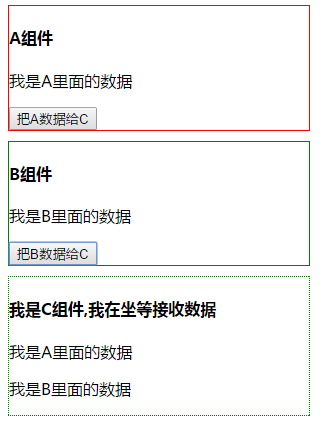
vue中$emit与$on和BUS
bus: //vue原型链挂载总线 Vue.prototype.bus = new Vue(); //子组件发送数据 this.bus.$emit("change",data); //子组件接收数据 this.bus.$on("change",function(data){ }) vue中$emit与$on var Event = new Vue(); 相当于又new了一个vue实例,Event中含有vue的全部方法; Event.$emit('msg',this.msg); 发送数据,第一个参数是发送数据的名称,接收时还用这个名字接收,第二个参数是这个数据现在的位置; Event.$on('msg',function(msg){ 接收数据,第一个参数是数据的名字,与发送时的名字对应,第二个参数是一个方法,要对数据的操作 /这里是对数据的操作 }) 例:
|
1 2 3 4 5 6 7 8 9 10 11 12 13 14 15 16 17 18 19 20 21 22 23 24 25 26 27 28 29 30 31 32 33 34 35 36 37 38 39 40 41 42 43 44 45 46 47 48 49 50 51 52 53 54 55 56 57 58 59 60 61 62 63 64 65 66 67 68 69 70 71 72 73 74 75 76 77 78 79 80 81 82 83 84 85 86 87 88 89 90 91 92 93 94 |
<!DOCTYPE html> <html> <head> <meta charset="utf-8" /> <title>孙三峰--博客园</title> <script type="text/javascript" src="js/vue2.0.3.js" ></script> <script type="text/javascript"> //准备一个空的实例对象 var Event = new Vue(); var A={ template:` <div style="border: 1px solid red; margin-bottom: 10px; width: 300px;"> <h4>A组件</h4> <p>{{a}}</p> <input type="button" value="把A数据给C" @click="send" /> </div> `, data(){ return { a:'我是A里面的数据' } }, methods:{ send(){ //A发送数据 Event.$emit('a-msg',this.a); } } }; var B={ template:` <div style="border: 1px solid green; margin-bottom: 10px; width: 300px;"> <h4>B组件</h4> <p>{{b}}</p> <input type="button" value="把B数据给C" @click="send" /> </div> `, data(){ return { b:'我是B里面的数据' } }, methods:{ send(){ Event.$emit('b-msg',this.b); } } }; var C={ template:` <div style="border: 1px dotted green; margin-bottom: 10px;width: 300px;"> <h4>我是C组件,我在坐等接收数据</h4> <p>{{a}}</p> <p>{{b}}</p> </div> `, data(){ return{ a:'', b:'' } }, mounted(){ //两种接收的方式 var _this = this; Event.$on('a-msg',function(a){ _this.a=a; }); Event.$on('b-msg',function(b){ this.b = b; }.bind(this)) } }; window.onload=function(){ new Vue({ el:'#box', data:{ }, components:{ 'com-a':A, 'com-b':B, 'com-c':C } }) } </script> </head> <body> <div id="box"> <com-a></com-a> <com-b></com-b> <com-c></com-c> </div> </body> </html> |
效果图: from:https://www.cnblogs.com/wang-sai-sai/p/11158770.html
View Details
解决postMessage跨域问题
在HTML5中新增了postMessage方法,postMessage可以实现跨文档消息传输(Cross Document Messaging),Internet Explorer 8, Firefox 3, Opera 9, Chrome 3和 Safari 4都支持postMessage。 该方法可以通过绑定window的message事件来监听发送跨文档消息传输内容。 1. postMessage是HTML5 XMLHttpRequest Level 2中的API,且是为数不多可以跨域操作的window属性之一,它可用于解决以下方面的问题: a.) 页面和其打开的新窗口的数据传递 b.) 多窗口之间消息传递 c.) 页面与嵌套的iframe消息传递 d.) 上面三个场景的跨域数据传递 2. postMessage用法:
|
1 |
postMessage(data,origin)方法接受两个参数 |
参数说明: data: html5规范支持任意基本类型或可复制的对象,但部分浏览器只支持字符串,所以传参时最好用JSON.stringify()序列化。 origin: 协议+主机+端口号,也可以设置为"*",表示可以传递给任意窗口,如果要指定和当前窗口同源的话设置为"/"。 举例说明: 两个页面之间进行数据传输,postMessage示例: 我启动了两个ip地址来代表不同域名,页面t_hotnotes_list.html插入如下代码
|
1 2 3 4 5 6 7 8 9 10 11 12 13 14 15 16 17 18 19 |
<iframe id="iframe" src="http://10.73.154.73:8088/rbc/t/search_role.html" style="display:none;"></iframe> <script> var iframe = document.getElementById('iframe'); iframe.onload = function() { var data = { name: 'aym', type:'wuhan' }; // 向domain2传送跨域数据 iframe.contentWindow.postMessage(JSON.stringify(data), 'http://10.73.154.73:8088'); }; // 接受domain2返回数据,这边给延迟的原因,因为同步传输时,页面不一定立马拿到数据,所以给延迟 setTimeout(function(){ window.addEventListener('message', function(e) { alert('data from domain2 sss ---> ' + e.data); }, false); },10) </script> |
页面search_role.html插入如下代码:
|
1 2 3 4 5 6 7 8 9 10 11 12 13 14 15 16 |
<script> // 接收domain1的数据 window.addEventListener('message', function(e) { console.log(e.data); var data = JSON.parse(e.data); if (data) { data.number = 16; data.age = 89; data.icon = 'sfafdafdafasdf'; // 处理后再发回domain1 window.parent.postMessage(JSON.stringify(data), 'http://10.73.154.72:8088'); } }, false); </script> |
当两个服务启动之后,我们在浏览器中打开页面t_hotnotes_list.html
|
1 |
http://10.73.154.72:8088/rbc/t/t_hotnotes_list.html |
得到如下图结果,t_hotnotes_list.html得到两个页面的数据 from:https://www.cnblogs.com/yyy6/p/9481671.html
View Details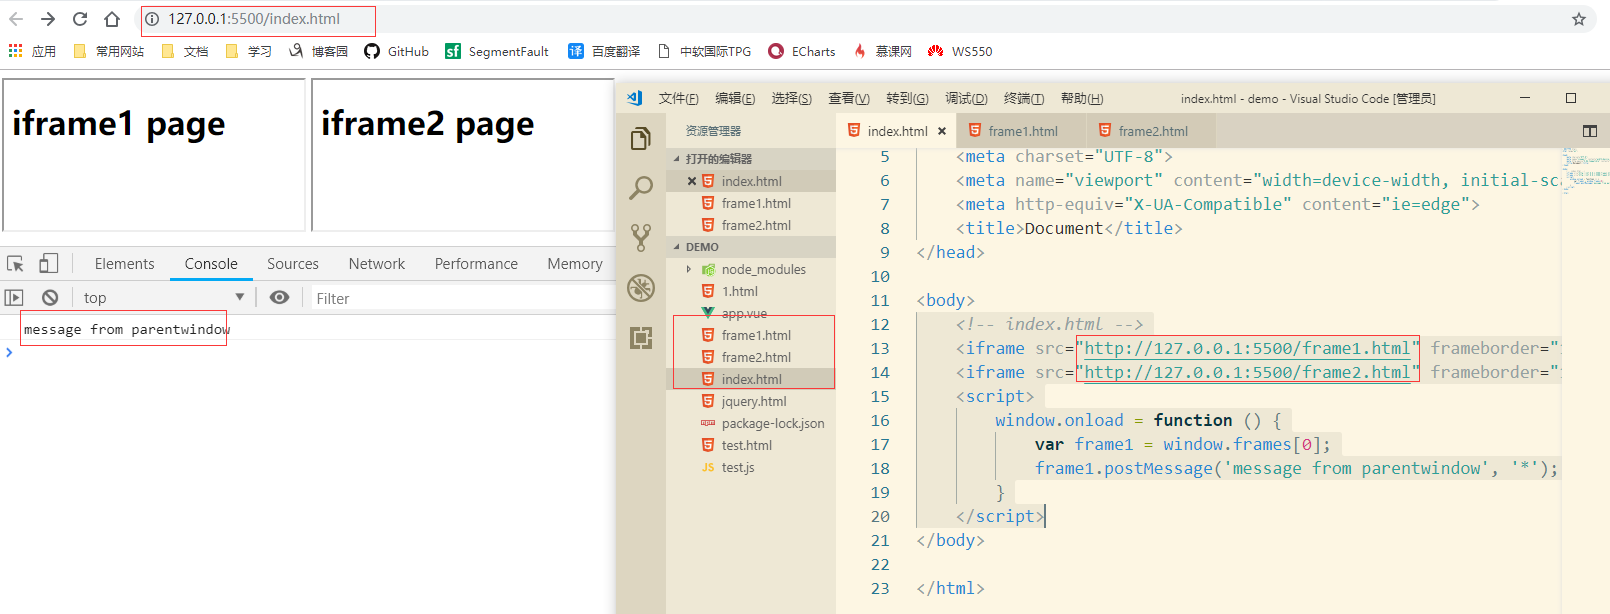
postMessage的使用
一、简介# 1、postMessage()方法允许来自不同源的脚本采用异步方式进行有限的通信,可以实现跨文本档、多窗口、跨域消息传递 2、postMessage(data,origin)方法接受两个参数: (1)data:要传递的数据,html5规范中提到该参数可以是JavaScript的任意基本类型或可复制的对象,然而并不是所有浏览器都做到了这点儿,部分浏览器只能处理字符串参数,所以我们在传递参数的时候需要使用JSON.stringify()方法对对象参数序列化,在低版本IE中引用json2.js可以实现类似效果, (2)origin:字符串参数,指明目标窗口的源,协议+主机+端口号[+URL],URL会被忽略,所以可以不写,这个参数是为了安全考虑,postMessage()方法只会将message传递给指定窗口,当然如果愿意也可以建参数设置为"*",这样可以传递给任意窗口,如果要指定和当前窗口同源的话设置为"/"; 二、使用# 1、子页面向父页面传递消息 <!-- frame1.html --> <h1>iframe1 page</h1> <script> window.top.postMessage('message from iframe1'); </script> 2、父页面向子页面传递消息
|
1 2 3 4 5 6 7 8 9 |
<!-- index.html --> <iframe src="http://127.0.0.1:5500/frame1.html" frameborder="1"></iframe> <iframe src="http://127.0.0.1:5500/frame2.html" frameborder="1"></iframe> <script> window.onload = function () { var frame1 = window.frames[0]; frame1.postMessage('message from parentwindow', '*'); } </script> |
|
1 2 3 4 5 6 7 |
<!-- frame1.html --> <h1>iframe1 page</h1> <script> window.addEventListener('message',function(e){ console.log(e.data) },false) </script> |
from:https://www.cnblogs.com/EricZLin/p/10534537.html
View Details![Dapper.Contrib:GetAsync<T> only supports an entity with a [Key] or an [ExplicitKey]](https://longsheng.org/wp-content/uploads/2020/04/cbb27326ee10fe01c92206299827a836.png)
Dapper.Contrib:GetAsync only supports an entity with a [Key] or an [ExplicitKey]
property 异常处理:http://www.cnblogs.com/dunitian/p/4523006.html#dapper 原来Model是这样滴 修改后是这样滴 注意点:Model里面的Table和Key是Dapper.Contrib.Extensions命名空间下的 成功~ from:https://www.cnblogs.com/dunitian/p/5710467.html
View Details