Category Archives: Programming Language
基于IdentityServer4 实现.NET Core的认证授权
目录 IdentityServer4是什么? OpenID Connect 和 OAuth2.0是什么 Authentication 和 Authorization的区别 OAuth2.0的原理 IdentityServer4能做什么 IdentityServer4定义的基本术语 IdentityServer4的简单示例 IdentityServer4是什么? IdentityServer4是基于ASP.NET Core实现的认证和授权框架,是对OpenID Connect和OAuth 2.0协议的实现。 OpenID Connect 和 OAuth2.0是什么 OpenID Connect: OpenID Connect由OpenID基金会于2014年发布的一个开放标准, 是建立在OAuth 2.0协议上的一个简单的身份标识层, OpenID Connect 兼容 OAuth 2.0. 实现身份认证(Authentication) 参考资料:https://openid.net/connect/ OpenID Connect文档:https://openid.net/specs/openid-connect-discovery-1_0.html OAuth2.0: OAuth2.0是一个开放的工业标准的授权协议(Authorization),它允许用户授权让第三方应用直接访问用户在某一个服务中的特定资源,但不提供给第三方账号及密码信息 参考资料:https://www.cnblogs.com/xiandnc/p/9763121.html OAuth2.0 文档:https://tools.ietf.org/html/rfc6749#page-73 Authentication 和 Authorization的区别 1 2 authentication: n. 证明;鉴定;证实 authorization: n. 授权,认可;批准,委任 前者是身份识别,鉴别你是谁;后者是授权许可,告诉你可以做什么。 举个例子:你吭哧吭哧写了一天的代码,急于回家吃上一口媳妇做的热饭。当你走到小区门口的时候你需要刷小区的门禁卡才能进入到小区里面,然后再找到你家在哪一栋楼,几单元几号,然后掏出钥匙开门才能回到家。在这个过程中刷小区的门禁就是认证你是这个小区的人,拿你家的钥匙开门就是授权的过程,如果你的认证不通过,那就不存在授权。 OAuth2.0的原理 我们先来了解一下OAuth2.0中的几个关键概念: 资源所有者(Resource Owner): 一个能够访问受保护资源的实体。当资源所有者是一个人时,它被称为终端用户 资源服务器(Resource Server): 托管受保护资源的服务器,能够使用访问令牌接受和响应受保护的资源请求 客户端(Client): 代表资源所有者和其授权的应用程序来保护资源请求。术语客户端并不意味着任何特定的实现特征(例如,应用程序是否在服务器、桌面或其他设备上执行) 授权服务器(Authorization Server): 在成功验证资源所有者并获得授权之后,服务器向客户端发出访问令牌。(授权服务器是用来管理Resource Owner,Resource Server,Client的中间人) 场景:小李想要打印(美图快印)自己三年来发布在新浪微博相册中和女朋友的照片,有没有什么方法他既不告诉工作人员自己的新浪微博用账号和密码又能够方便快捷的把照片给到美图快印呢?(排除存U盘这种手工操作) Authorization Server和Resource Server可以使独立的服务提供商,也可以是在一起的,比如例子中新浪微博既作授权服务器也用来存储用户的图片资源。我们可以看到OAuth2解决的问题是:通过Authorization Server可以提供一个访问的凭据(token)给client(美图快印的工作人员),使得client可以在不知道Resource Owner以及Resource Server的用户名和密码的情况下访问到Resource Owner受保护的资源,它是一个完美的中间人。 OAuth2.0详细内容请参考:https://www.cnblogs.com/xiandnc/p/9763121.html IdentityServer4能做什么 用户认证服务 基于OpenID Connect实现的独立的认证服务实现对多平台(web, native, mobile, services)的集中认证 API访问授权 […]
View DetailsJava Set集合的详解
一,Set Set:注重独一无二的性质,该体系集合可以知道某物是否已近存在于集合中,不会存储重复的元素 用于存储无序(存入和取出的顺序不一定相同)元素,值不能重复。 对象的相等性 引用到堆上同一个对象的两个引用是相等的。如果对两个引用调用hashCode方法,会得到相同的结果,如果对象所属的类没有覆盖Object的hashCode方法的话,hashCode会返回每个对象特有的序号(java是依据对象的内存地址计算出的此序号),所以两个不同的对象的hashCode值是不可能相等的。 如果想要让两个不同的Person对象视为相等的,就必须覆盖Object继下来的hashCode方法和equals方法,因为Object hashCode方法返回的是该对象的内存地址,所以必须重写hashCode方法,才能保证两个不同的对象具有相同的hashCode,同时也需要两个不同对象比较equals方法会返回true 该集合中没有特有的方法,直接继承自Collection。
|
1 2 3 4 5 6 7 8 9 10 11 |
---| Itreable 接口 实现该接口可以使用增强for循环 ---| Collection 描述所有集合共性的接口 ---| List接口 可以有重复元素的集合 ---| ArrayList ---| LinkedList ---| Set接口 不可以有重复元素的集合 |
案例:set集合添加元素并使用迭代器迭代元素。
|
1 2 3 4 5 6 7 8 9 10 11 12 13 14 15 16 17 18 19 20 21 22 23 24 25 26 27 28 29 30 31 |
public class Demo4 { public static void main(String[] args) { //Set 集合存和取的顺序不一致。 Set hs = new HashSet(); hs.add("世界军事"); hs.add("兵器知识"); hs.add("舰船知识"); hs.add("汉和防务"); System.out.println(hs); // [舰船知识, 世界军事, 兵器知识, 汉和防务] Iterator it = hs.iterator(); while (it.hasNext()) { System.out.println(it.next()); } } } |
二,HashSet
|
1 2 3 4 5 6 7 8 9 10 11 12 13 |
---| Itreable 接口 实现该接口可以使用增强for循环 ---| Collection 描述所有集合共性的接口 ---| List接口 可以有重复元素的集合 ---| ArrayList ---| LinkedList ---| Set接口 不可以有重复元素的集合 ---| HashSet 线程不安全,存取速度快。底层是以哈希表实现的。 |
HashSet 哈希表边存放的是哈希值。HashSet存储元素的顺序并不是按照存入时的顺序(和List显然不同) 是按照哈希值来存的所以取数据也是按照哈希值取得。 HashSet不存入重复元素的规则.使用hashcode和equals 由于Set集合是不能存入重复元素的集合。那么HashSet也是具备这一特性的。HashSet如何检查重复?HashSet会通过元素的hashcode()和equals方法进行判断元素师否重复。 当你试图把对象加入HashSet时,HashSet会使用对象的hashCode来判断对象加入的位置。同时也会与其他已经加入的对象的hashCode进行比较,如果没有相等的hashCode,HashSet就会假设对象没有重复出现。 简单一句话,如果对象的hashCode值是不同的,那么HashSet会认为对象是不可能相等的。 因此我们自定义类的时候需要重写hashCode,来确保对象具有相同的hashCode值。 如果元素(对象)的hashCode值相同,是不是就无法存入HashSet中了? 当然不是,会继续使用equals 进行比较.如果 equals为true 那么HashSet认为新加入的对象重复了,所以加入失败。如果equals 为false那么HashSet 认为新加入的对象没有重复.新元素可以存入. 总结: 元素的哈希值是通过元素的hashcode方法 来获取的, HashSet首先判断两个元素的哈希值,如果哈希值一样,接着会比较equals方法 如果 equls结果为true ,HashSet就视为同一个元素。如果equals 为false就不是同一个元素。 哈希值相同equals为false的元素是怎么存储呢,就是在同样的哈希值下顺延(可以认为哈希值相同的元素放在一个哈希桶中)。也就是哈希一样的存一列。 hashtable 图1:hashCode值不相同的情况 图2:hashCode值相同,但equals不相同的情况。 HashSet:通过hashCode值来确定元素在内存中的位置。一个hashCode位置上可以存放多个元素。 当hashcode() 值相同equals() 返回为true 时,hashset 集合认为这两个元素是相同的元素.只存储一个(重复元素无法放入)。调用原理:先判断hashcode 方法的值,如果相同才会去判断equals 如果不相同,是不会调用equals方法的。 HashSet到底是如何判断两个元素重复。 通过hashCode方法和equals方法来保证元素的唯一性,add()返回的是boolean类型 判断两个元素是否相同,先要判断元素的hashCode值是否一致,只有在该值一致的情况下,才会判断equals方法,如果存储在HashSet中的两个对象hashCode方法的值相同equals方法返回的结果是true,那么HashSet认为这两个元素是相同元素,只存储一个(重复元素无法存入)。 注意:HashSet集合在判断元素是否相同先判断hashCode方法,如果相同才会判断equals。如果不相同,是不会调用equals方法的。 HashSet 和ArrayList集合都有判断元素是否相同的方法, boolean contains(Object o) HashSet使用hashCode和equals方法,ArrayList使用了equals方法 案例: 使用HashSet存储字符串,并尝试添加重复字符串 回顾String类的equals()、hashCode()两个方法。
|
1 2 3 4 5 6 7 8 9 10 11 12 13 14 15 16 17 18 19 20 21 22 23 24 25 26 27 28 29 30 31 32 33 34 35 36 37 38 39 40 41 42 43 44 45 46 47 |
public class Demo4 { public static void main(String[] args) { // Set 集合存和取的顺序不一致。 Set hs = new HashSet(); hs.add("世界军事"); hs.add("兵器知识"); hs.add("舰船知识"); hs.add("汉和防务"); // 返回此 set 中的元素的数量 System.out.println(hs.size()); // 4 // 如果此 set 尚未包含指定元素,则返回 true boolean add = hs.add("世界军事"); // false System.out.println(add); // 返回此 set 中的元素的数量 System.out.println(hs.size());// 4 Iterator it = hs.iterator(); while (it.hasNext()) { System.out.println(it.next()); } } } |
使用HashSet存储自定义对象,并尝试添加重复对象(对象的重复的判定)
|
1 2 3 4 5 6 7 8 9 10 11 12 13 14 15 16 17 18 19 20 21 22 23 24 25 26 27 28 29 30 31 32 33 34 35 36 37 38 39 40 41 42 43 44 45 46 47 48 49 50 51 52 53 54 55 56 57 58 59 60 61 62 63 64 65 66 67 68 69 70 71 72 73 74 75 76 77 78 79 80 81 82 83 84 85 86 87 88 89 90 91 92 93 94 95 96 97 98 99 100 101 102 103 104 105 106 107 108 109 110 111 112 113 114 115 116 117 118 119 120 121 122 123 124 125 126 127 128 129 130 131 132 133 134 135 136 137 138 139 140 141 |
public class Demo4 { public static void main(String[] args) { HashSet hs = new HashSet(); hs.add(new Person("jack", 20)); hs.add(new Person("rose", 20)); hs.add(new Person("hmm", 20)); hs.add(new Person("lilei", 20)); hs.add(new Person("jack", 20)); Iterator it = hs.iterator(); while (it.hasNext()) { Object next = it.next(); System.out.println(next); } } } class Person { private String name; private int age; Person() { } public Person(String name, int age) { this.name = name; this.age = age; } public String getName() { return name; } public void setName(String name) { this.name = name; } public int getAge() { return age; } public void setAge(int age) { this.age = age; } @Override public int hashCode() { System.out.println("hashCode:" + this.name); return this.name.hashCode() + age * 37; } @Override public boolean equals(Object obj) { System.out.println(this + "---equals---" + obj); if (obj instanceof Person) { Person p = (Person) obj; return this.name.equals(p.name) && this.age == p.age; } else { return false; } } @Override public String toString() { return "Person@name:" + this.name + " age:" + this.age; } } |
问题:现在有一批数据,要求不能重复存储元素,而且要排序。ArrayList 、 LinkedList不能去除重复数据。HashSet可以去除重复,但是是无序。 所以这时候就要使用TreeSet了 三,TreeSet 案例:使用TreeSet集合存储字符串元素,并遍历
|
1 2 3 4 5 6 7 8 9 10 11 12 13 14 15 16 17 18 19 20 21 22 23 |
public class Demo5 { public static void main(String[] args) { TreeSet ts = new TreeSet(); ts.add("ccc"); ts.add("aaa"); ts.add("ddd"); ts.add("bbb"); System.out.println(ts); // [aaa, bbb, ccc, ddd] } } |
|
1 2 3 4 5 6 7 8 9 10 11 12 13 14 15 |
---| Itreable 接口 实现该接口可以使用增强for循环 ---| Collection 描述所有集合共性的接口 ---| List接口 有序,可以重复,有角标的集合 ---| ArrayList ---| LinkedList ---| Set接口 无序,不可以重复的集合 ---| HashSet 线程不安全,存取速度快。底层是以hash表实现的。 ---| TreeSet 红-黑树的数据结构,默认对元素进行自然排序(String)。如果在比较的时候两个对象返回值为0,那么元素重复。 |
红–黑树 红黑树是一种特定类型的二叉树 红黑树算法的规则: […]
View DetailsLinkedList、ConcurrentLinkedQueue、LinkedBlockingQueue对比分析
写这篇文章源于我经历过的一次生产事故,在某家公司的时候,有个服务会收集业务系统的日志,此服务的开发人员在给业务系统的sdk中就因为使用了LinkedList,又没有做并发控制,就造成了此服务经常不能正常收集到业务系统的日志(丢日志以及日志上报的线程停止运行)。看一下add()方法的源码,我们就可以知道原因了:
|
1 2 3 4 5 6 7 8 9 10 11 12 13 14 15 16 |
public boolean add(E e) { linkLast(e);//调用linkLast,在队列尾部添加元素 return true; } void linkLast(E e) { final Node<E> l = last; final Node<E> newNode = new Node<>(l, e, null); last = newNode; if (l == null) first = newNode; else l.next = newNode; size++;//多线程情况下,如果业务系统没做并发控制,size的数量会远远大于实际元素的数量 modCount++; } |
demo Lesson2LinkedListThreads 展示了在多线程且没有做并发控制的环境下,size的值远远大于了队列的实际值,100个线程,每个添加1000个元素,最后实际只加进去2030个元素: List的变量size值为:88371 第2031个元素取出为null 解决方案,使用锁或者使用ConcurrentLinkedQueue、LinkedBlockingQueue等支持添加元素为原子操作的队列。 上一节我们已经分析过LinkedBlockingQueue的put等方法的源码,是使用ReentrantLock来实现的添加元素原子操作。我们再简单看一下高并发queue的add和offer()方法,方法中使用了CAS来实现的无锁的原子操作: public boolean add(E e) { return offer(e); }
|
1 2 3 4 5 6 7 8 9 10 11 12 13 14 15 16 17 18 19 20 21 22 23 24 25 26 27 28 29 |
public boolean offer(E e) { checkNotNull(e); final Node<E> newNode = new Node<E>(e); for (Node<E> t = tail, p = t;;) { Node<E> q = p.next; if (q == null) { // p is last node if (p.casNext(null, newNode)) { // Successful CAS is the linearization point // for e to become an element of this queue, // and for newNode to become "live". if (p != t) // hop two nodes at a time casTail(t, newNode); // Failure is OK. return true; } // Lost CAS race to another thread; re-read next } else if (p == q) // We have fallen off list. If tail is unchanged, it // will also be off-list, in which case we need to // jump to head, from which all live nodes are always // reachable. Else the new tail is a better bet. p = (t != (t = tail)) ? t : head; else // Check for tail updates after two hops. p = (p != t && t != (t = tail)) ? t : q; } } |
接下来,我们再利用高并发queue对上面的demo进行改造,大家只要改变demo中的内容,讲下面两行的注释内容颠倒,即可发现没有丢失任何的元素: public static LinkedList list = new LinkedList(); //public static ConcurrentLinkedQueue list = new ConcurrentLinkedQueue(); 再看一下高性能queue的poll()方法,才觉得NB,取元素的方法也用CAS实现了原子操作,因此在实际使用的过程中,当我们在不那么在意元素处理顺序的情况下,队列元素的消费者,完全可以是多个,不会丢任何数据:
|
1 2 3 4 5 6 7 8 9 10 11 12 13 14 15 16 17 18 19 20 21 22 23 24 |
public E poll() { restartFromHead: for (;;) { for (Node<E> h = head, p = h, q;;) { E item = p.item; if (item != null && p.casItem(item, null)) { // Successful CAS is the linearization point // for item to be removed from this queue. if (p != h) // hop two nodes at a time updateHead(h, ((q = p.next) != null) ? q : p); return item; } else if ((q = p.next) == null) { updateHead(h, p); return null; } else if (p == q) continue restartFromHead; else p = q; } } } |
关于ConcurrentLinkedQueue和LinkedBlockingQueue: 1.LinkedBlockingQueue是使用锁机制,ConcurrentLinkedQueue是使用CAS算法,虽然LinkedBlockingQueue的底层获取锁也是使用的CAS算法 2.关于取元素,ConcurrentLinkedQueue不支持阻塞去取元素,LinkedBlockingQueue支持阻塞的take()方法,如若大家需要ConcurrentLinkedQueue的消费者产生阻塞效果,需要自行实现 3.关于插入元素的性能,从字面上和代码简单的分析来看ConcurrentLinkedQueue肯定是最快的,但是这个也要看具体的测试场景,我做了两个简单的demo做测试,测试的结果如下,两个的性能差不多,但在实际的使用过程中,尤其在多cpu的服务器上,有锁和无锁的差距便体现出来了,ConcurrentLinkedQueue会比LinkedBlockingQueue快很多: demo Lesson2ConcurrentLinkedQueuePerform:在使用ConcurrentLinkedQueue的情况下100个线程循环增加的元素数为:33828193 demo Lesson2LinkedBlockingQueuePerform:在使用LinkedBlockingQueue的情况下100个线程循环增加的元素数为:33827382 from:https://www.cnblogs.com/mantu/p/5802393.html
View DetailsJava并发容器之非阻塞队列ConcurrentLinkedQueue
参考资料:http://blog.csdn.net/chenchaofuck1/article/details/51660521 实现一个线程安全的队列有两种实现方式:一种是使用阻塞算法,阻塞队列就是通过使用加锁的阻塞算法实现的;另一种非阻塞的实现方式则可以使用循环CAS(比较并交换)的方式来实现。 ConcurrentLinkedQueue是一个基于链表实现的无界线程安全队列,它采用先进先出的规则对节点进行排序,当我们添加一个元素的时候,它会添加到队列的尾部,当我们获取一个元素时,它会返回队列头部的元素。默认情况下head节点存储的元素为空,tair节点等于head节点。 一:入队 入队主要做两件事情, 第一是将入队节点设置成当前队列的最后一个节点。 第二是更新tail节点,如果原来的tail节点的next节点不为空,则将tail更新为刚入队的节点(即队尾结点),如果原来的tail节点(插入前的tail)的next节点为空,则将入队节点设置成tail的next节点(而tial不移动,成为倒数第二个节点),所以tail节点不总是尾节点!
|
1 2 3 4 5 6 7 8 9 10 11 12 13 14 15 16 17 18 19 20 21 22 23 24 25 26 27 28 29 30 31 32 33 34 35 36 37 38 39 40 41 42 43 44 45 46 47 48 49 50 51 52 53 54 55 56 |
public boolean offer(E e) { if (e == null) throw new NullPointerException(); //入队前,创建一个入队节点 Node</e><e> n = new Node</e><e>(e); retry: //死循环,入队不成功反复入队。 for (;;) { //创建一个指向tail节点的引用 Node</e><e> t = tail; //p用来表示队列的尾节点,默认情况下等于tail节点。 Node</e><e> p = t; //获得p节点的下一个节点。 Node</e><e> next = succ(p); //next节点不为空,说明p不是尾节点,需要更新p后在将它指向next节点 if (next != null) { //循环了两次及其以上,并且当前节点还是不等于尾节点 if (hops > HOPS && t != tail) continue retry; p = next; } //如果p是尾节点,则设置p节点的next节点为入队节点。 else if (p.casNext(null, n)) { //如果tail节点有大于等于1个next节点,则将入队节点设置成tair节点,更新失败了也没关系,因为失败了表示有其他线程成功更新了tair节点。 if (hops >= HOPS) casTail(t, n); // 更新tail节点,允许失败 return true; } // p有next节点,表示p的next节点是尾节点,则重新设置p节点 else { p = succ(p); } } } } |
二:出队 不是每次出队时都更新head节点,当head节点里有元素时,直接弹出head节点里的元素,而不会更新head节点。只有当head节点里没有元素时,则弹出head的next结点并更新head结点为原来head的next结点的next结点。
|
1 2 3 4 5 6 7 8 9 10 11 12 13 14 15 16 17 18 19 20 21 22 23 24 25 26 27 28 29 30 31 32 33 |
public E poll() { Node</e><e> h = head; // p表示头节点,需要出队的节点 Node</e><e> p = h; for (int hops = 0;; hops++) { // 获取p节点的元素 E item = p.getItem(); // 如果p节点的元素不为空,使用CAS设置p节点引用的元素为null,如果成功则返回p节点的元素。 if (item != null && p.casItem(item, null)) { if (hops >= HOPS) { //将p节点下一个节点设置成head节点 Node</e><e> q = p.getNext(); updateHead(h, (q != null) ? q : p); } return item; } // 如果头节点的元素为空或头节点发生了变化,这说明头节点已经被另外一个线程修改了。那么获取p节点的下一个节点 Node</e><e> next = succ(p); // 如果p的下一个节点也为空,说明这个队列已经空了 if (next == null) { // 更新头节点。 updateHead(h, p); break; } // 如果下一个元素不为空,则将头节点的下一个节点设置成头节点 p = next; } return null; } |
三:非阻塞却线程安全的原因 观察入队和出队的源码可以发现,无论入队还是出队,都是在死循环中进行的,也就是说,当一个线程调用了入队、出队操作时,会尝试获取链表的tail、head结点进行插入和删除操作,而插入和删除是通过CAS操作实现的,而CAS具有原子性。故此,如果有其他任何一个线程成功执行了插入、删除都会改变tail/head结点,那么当前线程的插入和删除操作就会失败,则通过循环再次定位tail、head结点位置进行插入、删除,直到成功为止。也就是说,ConcurrentLinkedQueue的线程安全是通过其插入、删除时采取CAS操作来保证的。不会出现同一个tail结点的next指针被多个同时插入的结点所抢夺的情况出现。 from:https://www.cnblogs.com/ygj0930/p/6544543.html
View Detailsjava 中 阻塞队列 非阻塞队列 和普通队列的区别
阻 塞队列与普通队列的区别在于,当队列是空的时,从队列中获取元素的操作将会被阻塞,或者当队列是满时,往队列里添加元素的操作会被阻塞。试图从空的阻塞队列中获取元素的线程将会被阻塞,直到其他的线程往空的队列插入新的元素。同样,试图往已满的阻塞队列中添加新元素的线程同样也会被阻塞,直到其他的线程使队列重新变得空闲起来,如从队列中移除一个或者多个元素,或者完全清空队列. 1.ArrayDeque, (数组双端队列) 2.PriorityQueue, (优先级队列) 3.ConcurrentLinkedQueue, (基于链表的并发队列) 4.DelayQueue, (延期阻塞队列)(阻塞队列实现了BlockingQueue接口) 5.ArrayBlockingQueue, (基于数组的并发阻塞队列) 6.LinkedBlockingQueue, (基于链表的FIFO阻塞队列) 7.LinkedBlockingDeque, (基于链表的FIFO双端阻塞队列) 8.PriorityBlockingQueue, (带优先级的无界阻塞队列) 9.SynchronousQueue (并发同步阻塞队列) 阻塞队列和生产者-消费者模式 阻塞队列(Blocking queue)提供了可阻塞的put和take方法,它们与可定时的offer和poll是等价的。如果Queue已经满了,put方法会被阻塞直到有空间可用;如果Queue是空的,那么take方法会被阻塞,直到有元素可用。Queue的长度可以有限,也可以无限;无限的Queue永远不会充满,所以它的put方法永远不会阻塞。 阻塞队列支持生产者-消费者设计模式。一个生产者-消费者设计分离了“生产产品”和“消费产品”。该模式不会发现一个工作便立即处理,而是把工作置于一个任务(“to do”)清单中,以备后期处理。生产者-消费者模式简化了开发,因为它解除了生产者和消费者之间相互依赖的代码。生产者和消费者以不同的或者变化的速度生产和消费数据,生产者-消费者模式将这些活动解耦,因而简化了工作负荷的管理。 生产者-消费者设计是围绕阻塞队列展开的,生产者把数据放入队列,并使数据可用,当消费者为适当的行为做准备时会从队列中获取数据。生产者不需要知道消费者的省份或者数量,甚至根本没有消费者—它们只负责把数据放入队列。类似地,消费者也不需要知道生产者是谁,以及是谁给它们安排的工作。BlockingQueue可以使用任意数量的生产者和消费者,从而简化了生产者-消费者设计的实现。最常见的生产者-消费者设计是将线程池与工作队列相结合。 阻塞队列简化了消费者的编码,因为take会保持阻塞直到可用数据出现。如果生产者不能足够快地产生工作,让消费者忙碌起来,那么消费者只能一直等待,直到有工作可做。同时,put方法的阻塞特性也大大地简化了生产者的编码;如果使用一个有界队列,那么当队列充满的时候,生产者就会阻塞,暂不能生成更多的工作,从而给消费者时间来赶进进度。 有界队列是强大的资源管理工具,用来建立可靠的应用程序:它们遏制那些可以产生过多工作量、具有威胁的活动,从而让你的程序在面对超负荷工作时更加健壮。 虽然生产者-消费者模式可以把生产者和消费者的代码相互解耦合,但是它们的行为还是间接地通过共享队列耦合在一起了 类库中包含一些BlockingQueue的实现,其中LinkedBlockingQueue和ArrayBlockingQueue是FIFO队列,与 LinkedList和ArrayList相似,但是却拥有比同步List更好的并发性能。PriorityBlockingQueue是一个按优先级顺序排序的队列,当你不希望按照FIFO的属性处理元素时,这个PriorityBolckingQueue是非常有用的。正如其他排序的容器一样,PriorityBlockingQueue可以比较元素本身的自然顺序(如果它们实现了Comparable),也可以使用一个 Comparator进行排序。 最后一个BlockingQueue的实现是SynchronousQueue,它根本上不是一个真正的队列,因为它不会为队列元素维护任何存储空间。不过,它维护一个排队的线程清单,这些线程等待把元素加入(enqueue)队列或者移出(dequeue)队列。因为SynchronousQueue没有存储能力,所以除非另一个线程已经准备好参与移交工作,否则put和take会一直阻止。SynchronousQueue这类队列只有在消费者充足的时候比较合适,它们总能为下一个任务作好准备。 非阻塞算法 基于锁的算法会带来一些活跃度失败的风险。如果线程在持有锁的时候因为阻塞I/O,页面错误,或其他原因发生延迟,很可能所有的线程都不能前进了。 一个线程的失败或挂起不应该影响其他线程的失败或挂起,这样的算法成为非阻塞(nonblocking)算法;如果算法的每一个步骤中都有一些线程能够继续执行,那么这样的算法称为锁自由(lock-free)算法。在线程间使用CAS进行协调,这样的算法如果能构建正确的话,它既是非阻塞的,又是锁自由的。非竞争的CAS总是能够成功,如果多个线程以一个CAS竞争,总会有一个胜出并前进。非阻塞算法堆死锁和优先级倒置有“免疫性”(但它们可能会出现饥饿和活锁,因为它们允许重进入)。 非阻塞算法通过使用低层次的并发原语,比如比较交换,取代了锁。原子变量类向用户提供了这些底层级原语,也能够当做“更佳的volatile变量”使用,同时提供了整数类和对象引用的原子化更新操作。 from:https://blog.csdn.net/u012240455/article/details/81844055
View Details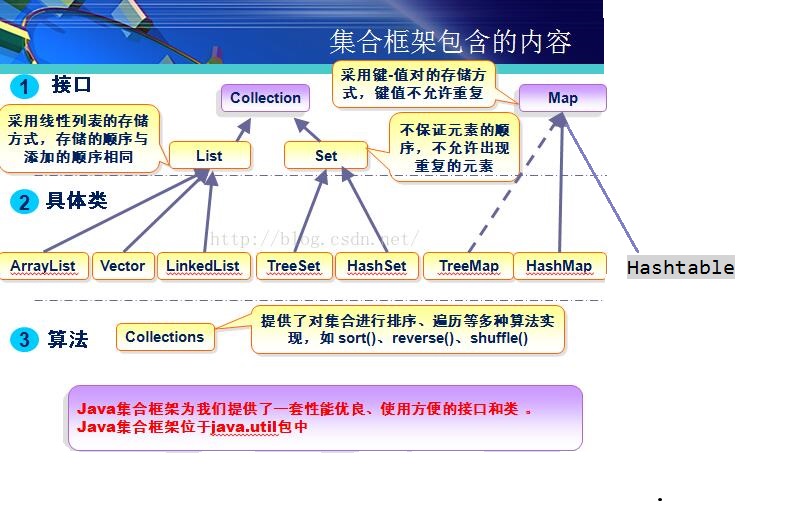
java队列——queue详细分析
Queue: 基本上,一个队列就是一个先入先出(FIFO)的数据结构 Queue接口与List、Set同一级别,都是继承了Collection接口。LinkedList实现了Deque接 口。 Queue的实现 1、没有实现的阻塞接口的LinkedList: 实现了java.util.Queue接口和java.util.AbstractQueue接口 内置的不阻塞队列: PriorityQueue 和 ConcurrentLinkedQueue PriorityQueue 和 ConcurrentLinkedQueue 类在 Collection Framework 中加入两个具体集合实现。 PriorityQueue 类实质上维护了一个有序列表。加入到 Queue 中的元素根据它们的天然排序(通过其 java.util.Comparable 实现)或者根据传递给构造函数的 java.util.Comparator 实现来定位。 ConcurrentLinkedQueue 是基于链接节点的、线程安全的队列。并发访问不需要同步。因为它在队列的尾部添加元素并从头部删除它们,所以只要不需要知道队列的大 小, ConcurrentLinkedQueue 对公共集合的共享访问就可以工作得很好。收集关于队列大小的信息会很慢,需要遍历队列。 2)实现阻塞接口的: java.util.concurrent 中加入了 BlockingQueue 接口和五个阻塞队列类。它实质上就是一种带有一点扭曲的 FIFO 数据结构。不是立即从队列中添加或者删除元素,线程执行操作阻塞,直到有空间或者元素可用。 五个队列所提供的各有不同: * ArrayBlockingQueue :一个由数组支持的有界队列。 * LinkedBlockingQueue :一个由链接节点支持的可选有界队列。 * PriorityBlockingQueue :一个由优先级堆支持的无界优先级队列。 * DelayQueue :一个由优先级堆支持的、基于时间的调度队列。 * SynchronousQueue :一个利用 BlockingQueue 接口的简单聚集(rendezvous)机制。 下表显示了jdk1.5中的阻塞队列的操作: add 增加一个元索 如果队列已满,则抛出一个IIIegaISlabEepeplian异常 remove 移除并返回队列头部的元素 如果队列为空,则抛出一个NoSuchElementException异常 element 返回队列头部的元素 如果队列为空,则抛出一个NoSuchElementException异常 offer 添加一个元素并返回true 如果队列已满,则返回false poll 移除并返问队列头部的元素 如果队列为空,则返回null peek 返回队列头部的元素 如果队列为空,则返回null put 添加一个元素 如果队列满,则阻塞 take 移除并返回队列头部的元素 如果队列为空,则阻塞 remove、element、offer 、poll、peek 其实是属于Queue接口。 阻塞队列的操作可以根据它们的响应方式分为以下三类:aad、removee和element操作在你试图为一个已满的队列增加元素或从空队列取得元素时 抛出异常。当然,在多线程程序中,队列在任何时间都可能变成满的或空的,所以你可能想使用offer、poll、peek方法。这些方法在无法完成任务时 只是给出一个出错示而不会抛出异常。 注意:poll和peek方法出错进返回null。因此,向队列中插入null值是不合法的 最后,我们有阻塞操作put和take。put方法在队列满时阻塞,take方法在队列空时阻塞。 LinkedBlockingQueue的容量是没有上限的(说的不准确,在不指定时容量为Integer.MAX_VALUE,不要然的话在put时怎么会受阻呢),但是也可以选择指定其最大容量,它是基于链表的队列,此队列按 FIFO(先进先出)排序元素。 ArrayBlockingQueue在构造时需要指定容量, 并可以选择是否需要公平性,如果公平参数被设置true,等待时间最长的线程会优先得到处理(其实就是通过将ReentrantLock设置为true来 达到这种公平性的:即等待时间最长的线程会先操作)。通常,公平性会使你在性能上付出代价,只有在的确非常需要的时候再使用它。它是基于数组的阻塞循环队 列,此队列按 FIFO(先进先出)原则对元素进行排序。 PriorityBlockingQueue是一个带优先级的 队列,而不是先进先出队列。元素按优先级顺序被移除,该队列也没有上限(看了一下源码,PriorityBlockingQueue是对 PriorityQueue的再次包装,是基于堆数据结构的,而PriorityQueue是没有容量限制的,与ArrayList一样,所以在优先阻塞 队列上put时是不会受阻的。虽然此队列逻辑上是无界的,但是由于资源被耗尽,所以试图执行添加操作可能会导致 OutOfMemoryError),但是如果队列为空,那么取元素的操作take就会阻塞,所以它的检索操作take是受阻的。另外,往入该队列中的元 素要具有比较能力。 DelayQueue(基于PriorityQueue来实现的)是一个存放Delayed […]
View Details为什么用Dubbo而不是Spring Cloud?基于支付场景的微服务高可用架构实战
今天给大家带来的分享是基于支付场景的一个微服务实战,会更偏向于应用层的内容。 主要围绕以下四点进行分享: SOA 与微服务 老支付架构遇到的挑战 基于微服务怎么做的改造 未来计划要做的事 SOA 与微服务 在我看来,微服务虽是国外传进来的技术,却和咱们中国的一些理论是挂钩的。所以在正式进入主题之前,先给大家简单介绍一下麦田理论。 关于麦田理论 古代周朝时期,老百姓种地实际是没有任何规划的,也没有任何区域的限制。 一般来说在地里一会种水稻,一会种小麦,一会种蔬菜地交叉来种,可收成之后发现庄稼受阳光程度非常低,营养非常不均衡,后期维护成本非常高。 直到战国时期,有一位农业专家把地划分为多个区域,每一个区域种一种庄稼,地跟地隔开,形成最初的微服务理念。 过去我们看到的很多文章都只是讲到 SOA 和微服务之间的比较,我今天在这个基础上加了一个 DDD。下面就 DDD、SOA 以及微服务的演进过程先做个引子。 DDD、SOA 与微服务 SOA 架构 SOA 是上一个时代的产物,大概是在 2010 年之前出现的,最早提出时是提供给传统行业计算领域的解决方案,当时 Oracle、IBM 也提了很多方案,包括出现的很多流程引擎。 它的思想是将紧耦合的系统,划分为面向业务的粗粒度、松耦合、无状态的服务。 在这之后,微服务的提出者基于 SOA 做了一个改进,就把它变成单一职责、独立部署、细小的微服务,是一个相反的概念。 微服务与 DDD 今天我们一说到微服务就会想到 DDD,有不少朋友认为 DDD 就是为微服务而生的。其实不是这样的,我在接触 DDD 时,它最早是用来做 UML 设计、领域建模的。 DDD 讲究充血模型,而 J2EE 模型以传统的分层架构和 Spring 架构捆绑在一起形成了以贫血模型为主的架构模式。 贫血模型的优点是容易入门、分层清晰,而充血模型要求设计者前期对业务理解较深,不然后期项目会产生混乱。 另外就是 DDD 思想比较宽泛,导致形成百家争鸣的姿态,没有形成一套固定的方法论。 开发者不容易理解,所以后面关注 DDD 的人变少了,而微服务的提出巧妙地借鉴了 DDD 里面的限界上下文、子域、领域事件等关键词,在微服务得到越来越多业界认可的情况下,也给 DDD 带来了重新的焕发机会。 老支付架构遇到的挑战 判断项目好坏的两个角度 我们判断一个优秀项目的好坏,可以从优秀的代码和高可用架构两个方向来讲。 我们在设计高可用架构的同时,也不能忽视代码的重要性,优秀的代码指的是冗错能力、冥等操作、并发情况、死锁情况等,并不一定是指代码写得多漂亮。 这就好比盖楼一样,楼房的基础架子搭得很好,但盖房的工人不够专业,有很多需要注意的地方忽略了,那么在往里面填砖加瓦的时候出了问题。 后果就是房子经常漏雨,墙上有裂缝等各种问题出现,虽然不至于楼房塌陷,但楼房也已经变成了危楼。 从代码和设计的角度来看有: 由不合理的代码所引起的项目无扩展性 数据库经常发生死锁 数据库事务乱用,导致事务占用时间过长 代码容错能力很差,经常因为考虑不足引起事故 程序中打印的大量的无用日志,并且引起性能问题 常用配置信息依然从数据库中读取 滥用线程池,造成栈和堆溢出 从库中查询数据,每次全部查出 业务代码研发不考虑幂等操作 使用缓存不合理,存在惊群效应、缓存穿透等情况 代码上下流流程定义混乱 异常处理机制混乱 再从整体架构角度来看: 整体依然使用单体集群架构 采用单机房服务器布署方式 采用 Nginx+hessian 的方式实现服务化 业务架构划分不彻底,边界模糊 项目拆分不彻底,一个 […]
View DetailsDubbo和Spring Cloud微服务架构比较
Dubbo 出生于阿里系,是阿里巴巴服务化治理的核心框架,并被广泛应用于中国各互联网公司;只需要通过 Spring 配置的方式即可完成服务化,对于应用无入侵,设计的目的还是服务于自身的业务为主。 微服务架构是互联网很热门的话题,是互联网技术发展的必然结果。它提倡将单一应用程序划分成一组小的服务,服务之间互相协调、互相配合,为用户提供最终价值。 虽然微服务架构没有公认的技术标准和规范或者草案,但业界已经有一些很有影响力的开源微服务架构框架提供了微服务的关键思路,例如 Dubbo 和 Spring Cloud。 各大互联网公司也有自研的微服务框架,但其模式都与这二者相差不大。 微服务主要的优势 降低复杂度 将原来耦合在一起的复杂业务拆分为单个服务,规避了原本复杂度无止境的积累。 每一个微服务专注于单一功能,并通过定义良好的接口清晰表述服务边界;每个服务开发者只专注服务本身,通过使用缓存、DAL 等各种技术手段来提升系统的性能,而对于消费方来说完全透明。 可独立部署 由于微服务具备独立的运行进程,所以每个微服务可以独立部署。当业务迭代时只需要发布相关服务的迭代即可,降低了测试的工作量同时也降低了服务发布的风险。 容错 在微服务架构下,当某一组件发生故障时,故障会被隔离在单个服务中。比如通过限流、熔断等方式降低错误导致的危害,保障核心业务正常运行。 扩展 单块架构应用也可以实现横向扩展,就是将整个应用完整的复制到不同的节点。 当应用的不同组件在扩展需求上存在差异时,微服务架构便体现出其灵活性,因为每个服务可以根据实际需求独立进行扩展。 本文主要围绕微服务的技术选型、通讯协议、服务依赖模式、开始模式、运行模式等几方面来综合比较 Dubbo 和 Spring Cloud 这 2 种开发框架。 架构师可以根据公司的技术实力并结合项目的特点来选择某个合适的微服务架构平台,以此稳妥地实施项目的微服务化改造或开发进程。 核心部件 微服务的核心要素在于服务的发现、注册、路由、熔断、降级、分布式配置,基于上述几种必要条件对 Dubbo 和 Spring Cloud 做出对比。 总体架构 Dubbo 核心部件(如下图): Provider:暴露服务的提供方,可以通过 jar 或者容器的方式启动服务。 Consumer:调用远程服务的服务消费方。 Registry:服务注册中心和发现中心。 Monitor:统计服务和调用次数,调用时间监控中心。(Dubbo 的控制台页面中可以显示,目前只有一个简单版本。) Container:服务运行的容器。 Dubbo 总体架构 Spring Cloud总体架构(如下图): Service Provider: 暴露服务的提供方。 Service Consumer:调用远程服务的服务消费方。 EureKa Server: 服务注册中心和服务发现中心。 Spring Cloud 总体架构 点评:从整体架构上来看,二者模式接近,都需要服务提供方,注册中心,服务消费方。 微服务架构核心要素 Dubbo 只是实现了服务治理,而 Spring Cloud 子项目分别覆盖了微服务架构下的众多部件,服务治理只是其中的一个方面。 Dubbo 提供了各种 Filter,对于上述中“无”的要素,可以通过扩展 Filter 来完善。例如: 分布式配置:可以使用淘宝的 diamond、百度的 disconf 来实现分布式配置管理。 服务跟踪:可以使用京东开源的 Hydra,或者扩展 Filter 用 Zippin 来做服务跟踪。 批量任务:可以使用当当开源的 Elastic-Job、tbschedule。 点评:从核心要素来看,Spring […]
View Details在ASP.NET Core中使用百度在线编辑器UEditor
0x00 起因 最近需要一个在线编辑器,之前听人说过百度的UEditor不错,去官网下了一个。不过服务端只有ASP.NET版的,如果是为了能尽快使用,只要把ASP.NET版的服务端作为应用部署在IIS上就可以立即使用了。不过我的需求并不急,所以把ASP.NET移植到了ASP.NET Core上。整个过程很简单,只是重新引用了一些包,修改了几处代码,另外就是把Controller中比较长的一个switch语句块重构为了字典,根据url中的action参数从字典中找出并调用相应的Action处理,这样的好处就是如果要扩展action支持的操作无需修改源代码,只要扩展字典就可以,对扩展开放,对修改关闭。最后把服务端功能打成了nuget包UEditorNetCore,方便使用。这篇博客主要就介绍下如何使用UEditorNetCore快速实现UEditor服务端,也可以直接使用源代码中的示例,希望对有这方面需求的园友有所帮助。 0x01 总体设计 当接收到action后,UEditorService会从UEditorActionCollection中找到这个action对应的方法并调用,同时传入HttpContext参数。这些方法调用基层的服务XxxxHandler完成功能,并把返回内容通过HttpContext.Response.WriteAsync()方法写入。如果要扩展对action的支持,可以扩展UEditorActionCollection,具体方法后面有介绍。 0x02 如何使用UEditorNetCore 1.安装UEditorNetCore
|
1 |
Install-Package UEditorNetCore |
2.在Startup.cs的ConfigureServices方法中添加UEditorNetCore服务
|
1 2 3 4 5 6 7 |
public void ConfigureServices(IServiceCollection services) { //第一个参数为配置文件路径,默认为项目目录下config.json //第二个参数为是否缓存配置文件,默认false services.AddUEditorService() services.AddMvc(); } |
3.添加Controller用于处理来自UEditor的请求
|
1 2 3 4 5 6 7 8 9 10 11 12 13 14 |
[Route("api/[controller]")] //配置路由 public class UEditorController : Controller { private UEditorService ue; public UEditorController(UEditorService ue) { this.ue = ue; } public void Do() { ue.DoAction(HttpContext); } } |
4.修改前端配置文件ueditor.config.js serverUrl需要参照第3步Controller中配置的路由,按照上面步骤3中的配置,需要以下配置:
|
1 |
serverUrl:"/api/UEditor" |
这样配置后当前端要获取服务端UEditor配置时就会访问/api/UEditor?action=config。 5.修改服务端配置config.json 上传类的操作需要配置相应的PathFormat和Prefix。示例部署在web根目录,因此Prefix都设置为"/"。使用时要根据具体情况配置。 例如示例中图片上传的配置如下:
|
1 2 |
"imageUrlPrefix": "/", /* 图片访问路径前缀 */ "imagePathFormat": "upload/image/{yyyy}{mm}{dd}/{time}{rand:6}", |
关于PathFormat的详细配置可参照官方文档。 6.添加javascript引用
|
1 2 3 |
<script type="text/javascript" charset="utf-8" src="~/lib/ueditor/ueditor.config.js"></script> <script type="text/javascript" charset="utf-8" src="~/lib/ueditor/ueditor.all.min.js"> </script> <script type="text/javascript" charset="utf-8" src="~/lib/ueditor/lang/zh-cn/zh-cn.js"></script> |
0x03 扩展action UEditor前端和后端交互主要通过在url中给出不同的action参数实现的,例如/api/UEditor?action=config会从服务端获取UEditor配置信息。UEditorNetCore目前支持的有8种action: config 获取服务端配置信息 uploadimage 上传图片 uploadscrawl 上传涂鸦 uploadvideo 上传视频 uploadfile 上传文件 listimage 多图片上传 listfile 多文件上传 catchimage 抓取图片 如果以上action无法满足需求,可以方便的增加、覆盖、移除action。 增加action
|
1 2 3 4 5 6 7 8 9 10 11 12 13 |
public void ConfigureServices(IServiceCollection services) { services.AddUEditorService() .Add("test", context => { context.Response.WriteAsync("from test action"); }) .Add("test2", context => { context.Response.WriteAsync("from test2 action"); }); services.AddMvc(); } |
以上代码增加了名字为test和test2两个action,作为示例仅仅返回了字符串。当访问/api/UEditor?action=test时会返回"from test action"。在扩展action时可以使用Config获取服务端配置,也可以使用已有的Handlers,具体可以参考源代码。 覆盖现有action 上面的Add方法除了添加新action外还可以覆盖现有action。当现有的action可能不符合你的要求,可以Add一个同名的action覆盖现有的。 移除action 如果要移除某个action,可以使用Remove方法。
|
1 2 3 4 5 6 |
public void ConfigureServices(IServiceCollection services) { services.AddUEditorService() .Remove("uploadvideo"); services.AddMvc(); } |
以上代码中的Remove("uploadvideo")方法移除了名为uploadvideo的action。 0x04 相关资源 UEditorNetCore代码和示例:https://github.com/durow/UEditorNetCore UEditor代码:https://github.com/fex-team/ueditor UEditor官网:http://ueditor.baidu.com/website/index.html from:https://www.cnblogs.com/durow/p/6116393.html
View DetailsDubbo与DubboX区别
前世今生: Dubbo源于阿里的淘宝网开源的分布式的服务架构,致力于提供高性能和透明化的RPC远程服务调用方案,是SOA服务化治理方案的核心框架。淘宝网将其开源之后,得到了很多的拓展和支持(比较出名的有:当当网的扩展版本dubbox,京东的扩展版本jd-hydra等) Dubbox(即Dubbo eXtensions)是当当网Fork基于dubbo2.x的升级版本,兼容原有的dubbox。其中升级了zookeeper和spring版本,并且支持restfull风格的远程调用。。 版本: Dubbo目前已停止更新; Dubbox目前还在更新。 说明:dubbox和dubbo 2.x是兼容的, 没有改变dubbo的任何已有的功能和配置方式(除了升级了Spring之类的版本)。 据说淘宝网dubbo与一个非开源的框架HSF有争执,导致dubbo的团队已经解散了,但是其扩展的版本dubbox却得到不断的发展(升级更新); <!——--升级详情——--|——————-- dubbox-2.8.0:该版本已经在生产环境中使用,主要支持REST风格远程调用、支持Kryo和FST序列化、升级了Spring和Zookeeper客户端、调整了demo应用等等 dubbox-2.8.1:主要支持基于嵌入式tomcat的http-remoting,优化了REST客户端性能,在REST中支持限制服务端接纳的最大HTTP连接数等等 dubbox-2.8.2: 支持REST中的HTTP logging,包括HTTP header的字段和HTTP body中的消息体,方便调试、日志纪录等等 提供辅助类便于REST的中文处理 改变使用@Reference annotation配置时的异常处理方式,即当用annotation配置时,过去dubbo在启动期间不抛出依赖服务找不到的异常,而是在具体调用时抛出NPE,这与用XML配置时的行为不一致。 较大的充实了Dubbo REST的文档 dubbox-2.8.3: 在REST中支持dubbo统一的方式用bean validation annotation作参数校验(沈理) 在RpcContext上支持获取底层协议的Request/Response(沈理) 支持采用Spring的Java Config方式配置dubbo(马金凯) 在Dubbo协议中支持基于Jackson的json序列化(Dylan) 在Spring AOP代理过的对象上支持dubbo annotation配置(Dylan) 修正Dubbo管理界面中没有consumer时出现空指针异常(马金凯) 修正@Reference annotation中protocol设置不起作用的bug(沈理) 修正@Reference annotation放在setter方法上即会出错的bug(Dylan) 详见:https://github.com/dangdangdotcom/dubbox/releases ———/> 嵌入: dubbo:嵌入式Jetty dubbox:基于嵌入式tomcat实现dubbo的 HTTP remoting体系(即dubbo-remoting-http) 对Servlet API的支持: dubbo:2.5 dubbox:升级到3.1 序列化: dubbo: dubbox:基于Dubbo默认的RPC协议添加新的JSON序列化实现; 支持基于Kryo和FST的Java高效序列化实现; Zookeeper注册中心: dubbo:Dubbo提供了Zookeeper注册中心,在整个Dubbo的设计里面充分考虑到了各类用户的需求,一些底层的通讯或者是信息存储都提供有大量的不同的存储方案; dubbox:升级ZooKeeper客户端到最新版本; 使用场景: dubbo:使用Dubbo的RPC调用方式,服务间仍然会存在API强依赖; dubbox:相对于Dubbo支持了REST风格的原创调用(HTTP +JSON/XML); ——————————————————- ——简言之(dubbox基于dubbo的升级): ——————- 支持REST风格远程调用(HTTP + JSON/XML); 支持基于Kryo和FST的Java高效序列化实现; 支持基于Jackson的JSON序列化; 支持基于嵌入式Tomcat的HTTP remoting体系; 升级Spring至3.x; 升级ZooKeeper客户端; 支持完全基于Java代码的Dubbo配置; ————————————————- 附录: Dubbo: 官网首页:http://dubbo.io/ , 官方用户指南: http://dubbo.io/User+Guide-zh.htm可以当做SOA架构的学习资料 Dubbox: dubbox入门:http://www.cnblogs.com/yjmyzz/p/dubbox-demo.html dubbox架构: http://www.cnblogs.com/Javame/p/3632473.html 当当网dubbox学习参考文档:http://dangdangdotcom.github.io/dubbox/ 分布式服务框架 dubbo/dubbox 入门示例:http://www.cnblogs.com/wanghang/p/6298957.html ———————- […]
View Details