理解ASP.NET Core – 基于Cookie的身份认证(Authentication)
注:本文隶属于《理解ASP.NET Core》系列文章,请查看置顶博客或点击此处查看全文目录
概述
通常,身份认证(Authentication)和授权(Authorization)都会放在一起来讲。但是,由于这俩英文相似,且“认证授权”四个字经常连着用,导致一些刚接触这块知识的读者产生混淆,分不清认证和授权的区别,甚至认为这俩是同一个。所以,我想先给大家简单区分一下身份认证和授权。
身份认证
确认执行操作的人是谁。
当用户请求后台服务时,系统首先需要知道用户是谁,是张三、李四还是匿名?确认身份的这个过程就是“身份认证”。在我们的实际生活中,通过出示自己的身份证,别人就可以快速地确认你的身份。
授权
确认操作人是否有执行该项操作的权限。
确认身份后,已经获悉了用户信息,随后来到授权阶段。在本阶段,要做的是确认用户有没有执行该项操作的权限,如确认张三有没有商品查看权限、有没有编辑权限等。
Cookie
Cookie对于许多人来说,是一个再熟悉不过的东西,熟悉到现在的Web应用,基本离不开它,如果你对Cookie还不太了解,也别慌,我在文末给大家整理了一些高质量的文章,推荐对Cookie有一个整体的了解之后,再来继续阅读下方的内容!
基于Cookie进行身份认证,通常的方案是用户成功登录后,服务端将用户的必要信息记录在Cookie中,并发送给浏览器,后续当用户发送请求时,浏览器将Cookie传回服务端,服务端就可以通过Cookie中的信息确认用户信息了。
在开始之前,为了方便大家理解并能够实际操作,我已经准备好了一个示例程序,请访问XXTk.Auth.Samples.Cookies.Web获取源码。文章中的代码,基本上在示例程序中均有实现,强烈建议组合食用!
身份认证(Authentication)
添加身份认证中间件
在 ASP.NET Core 中,为了进行身份认证,需要在HTTP请求管道中通过UseAuthentication添加身份认证中间件——AuthenticationMiddleware:
|
1 2 3 4 5 6 7 8 9 10 11 12 13 14 15 16 17 18 19 20 21 22 23 24 25 26 27 |
public class Startup { public void Configure(IApplicationBuilder app, IWebHostEnvironment env) { if (env.IsDevelopment()) { app.UseDeveloperExceptionPage(); } else { app.UseExceptionHandler("/Home/Error"); } app.UseStaticFiles(); app.UseRouting(); // 身份认证中间件 app.UseAuthentication(); app.UseEndpoints(endpoints => { endpoints.MapControllerRoute( name: "default", pattern: "{controller=Home}/{action=Index}/{id?}"); }); } } |
UseAuthentication一定要放在UseEndpoints之前,否则Controller中无法通过HttpContext获取身份信息。
AuthenticationMiddleware做的事情很简单,就是确认用户身份,在代码层面上就是给HttpContext.User赋值,请参考下方代码:
|
1 2 3 4 5 6 7 8 9 10 11 12 13 14 15 16 17 18 19 20 21 22 23 24 25 26 27 28 29 30 31 32 33 34 35 36 37 38 39 40 41 42 43 44 45 46 |
public class AuthenticationMiddleware { private readonly RequestDelegate _next; public AuthenticationMiddleware(RequestDelegate next, IAuthenticationSchemeProvider schemes) { _next = next; Schemes = schemes; } public IAuthenticationSchemeProvider Schemes { get; set; } public async Task Invoke(HttpContext context) { // 记录原始路径和原始基路径 context.Features.Set<IAuthenticationFeature>(new AuthenticationFeature { OriginalPath = context.Request.Path, OriginalPathBase = context.Request.PathBase }); // 如果有显式指定的身份认证方案,优先处理(这里不用看,直接看下面) var handlers = context.RequestServices.GetRequiredService<IAuthenticationHandlerProvider>(); foreach (var scheme in await Schemes.GetRequestHandlerSchemesAsync()) { var handler = await handlers.GetHandlerAsync(context, scheme.Name) as IAuthenticationRequestHandler; if (handler != null && await handler.HandleRequestAsync()) { return; } } // 使用默认的身份认证方案进行认证,并赋值 HttpContext.User var defaultAuthenticate = await Schemes.GetDefaultAuthenticateSchemeAsync(); if (defaultAuthenticate != null) { var result = await context.AuthenticateAsync(defaultAuthenticate.Name); if (result?.Principal != null) { context.User = result.Principal; } } await _next(context); } } |
配置Cookie认证方案
现在,认证中间件已经加好了,现在需要在ConfigureServices方法中添加身份认证所需要用到的服务并进行认证方案配置。
我们可以通过AddAuthentication扩展方法来添加身份认证所需要的服务,并可选的指定默认认证方案的名称,以下方为例:
|
1 2 3 4 5 6 7 |
public class Startup { public void ConfigureServices(IServiceCollection services) { services.AddAuthentication(CookieAuthenticationDefaults.AuthenticationScheme); } } |
我们添加了身份认证所依赖的服务,并指定了一个名为CookieAuthenticationDefaults.AuthenticationScheme的默认认证方案,即Cookies。很明显,它是一个基于Cookie的身份认证方案。
CookieAuthenticationDefaults是一个静态类,定义了一些常用的默认值:
|
1 2 3 4 5 6 7 8 9 10 11 12 13 14 15 16 17 18 19 20 |
public static class CookieAuthenticationDefaults { // 认证方案名 public const string AuthenticationScheme = "Cookies"; // Cookie名字的前缀 public static readonly string CookiePrefix = ".AspNetCore."; // 登录路径 public static readonly PathString LoginPath = new PathString("/Account/Login"); // 注销路径 public static readonly PathString LogoutPath = new PathString("/Account/Logout"); // 访问拒绝路径 public static readonly PathString AccessDeniedPath = new PathString("/Account/AccessDenied"); // return url 的参数名 public static readonly string ReturnUrlParameter = "ReturnUrl"; } |
现在,我们已经指定了默认认证方案,接下来就是来配置这个方案的细节,通过后跟AddCookie来实现:
|
1 2 3 4 5 6 7 8 9 10 11 |
public class Startup { public void ConfigureServices(IServiceCollection services) { services.AddAuthentication(CookieAuthenticationDefaults.AuthenticationScheme); .AddCookie(CookieAuthenticationDefaults.AuthenticationScheme, options => { // 在这里对该方案进行详细配置 }); } } |
很明显,AddCookie的第一个参数就是指定该认证方案的名称,第二个参数是详细配置。
通过options,可以针对登录、注销、Cookie等方面进行详细配置。它的类型为CookieAuthenticationOptions,继承自AuthenticationSchemeOptions。 属性实在比较多,我就选择一些比较常用的来讲解一下。
另外,由于在针对选项进行配置时,需要依赖DI容器中的服务,所以不得不将选项的配置从AddCookie扩展方法中提出来。
请查看以下代码:
|
1 2 3 4 5 6 7 8 9 10 11 12 13 14 15 16 17 18 19 20 21 22 23 24 25 26 27 28 29 30 31 32 33 34 35 36 37 38 39 40 41 42 43 44 45 46 47 48 49 50 51 52 53 54 55 56 57 58 |
public class Startup { public void ConfigureServices(IServiceCollection services) { services.AddOptions<CookieAuthenticationOptions>(CookieAuthenticationDefaults.AuthenticationScheme) .Configure<IDataProtectionProvider>((options, dp) => { options.LoginPath = new PathString("/Account/Login"); options.LogoutPath = new PathString("/Account/Logout"); options.AccessDeniedPath = new PathString("/Account/AccessDenied"); options.ReturnUrlParameter = "returnUrl"; options.ExpireTimeSpan = TimeSpan.FromDays(14); //options.Cookie.Expiration = TimeSpan.FromMinutes(30); //options.Cookie.MaxAge = TimeSpan.FromDays(14); options.SlidingExpiration = true; options.Cookie.Name = "auth"; //options.Cookie.Domain = ".xxx.cn"; options.Cookie.Path = "/"; options.Cookie.SameSite = SameSiteMode.Lax; options.Cookie.HttpOnly = true; options.Cookie.SecurePolicy = CookieSecurePolicy.SameAsRequest; options.Cookie.IsEssential = true; options.CookieManager = new ChunkingCookieManager(); options.DataProtectionProvider ??= dp; var dataProtector = options.DataProtectionProvider.CreateProtector("Microsoft.AspNetCore.Authentication.Cookies.CookieAuthenticationMiddleware", CookieAuthenticationDefaults.AuthenticationScheme, "v2"); options.TicketDataFormat = new TicketDataFormat(dataProtector); options.Events.OnSigningIn = context => { Console.WriteLine($"{context.Principal.Identity.Name} 正在登录..."); return Task.CompletedTask; }; options.Events.OnSignedIn = context => { Console.WriteLine($"{context.Principal.Identity.Name} 已登录"); return Task.CompletedTask; }; options.Events.OnSigningOut = context => { Console.WriteLine($"{context.HttpContext.User.Identity.Name} 注销"); return Task.CompletedTask; }; options.Events.OnValidatePrincipal += context => { Console.WriteLine($"{context.Principal.Identity.Name} 验证 Principal"); return Task.CompletedTask; }; }); services.AddAuthentication(CookieAuthenticationDefaults.AuthenticationScheme) .AddCookie(CookieAuthenticationDefaults.AuthenticationScheme); } } |
以上配置,大多使用了程序的默认值,接下来一一进行详细讲解:
LoginPath:登录页路径,指向一个Action。- 默认
/Account/Login。 - 当服务端不允许匿名访问而需要确认用户信息时,跳转到该页面进行登录。
- 另外,登录方法通常会有一个参数,叫作
return url,用来当用户登录成功时,自动跳转回之前访问的页面。这个参数也会自动传递给该Action,下方会详细说明。
- 默认
LogoutPath:注销路径,指向一个Action。默认/Account/Logout。AccessDeniedPath:访问拒绝页路径,指向一个Action。默认/Account/AccessDenied。当出现Http状态码 403 时,会跳转到该页面。ReturnUrlParameter:上面提到的return url的参数名,参数值会通过 query 的方式传递到该参数中。默认ReturnUrl。ExpireTimeSpan:认证票据(authentication ticket)的有效期。- 默认 14 天
- 认证票据在代码中表现为类型为
AuthenticationTicket的对象,它就好像一个手提包,里面放满了可以证明你身份的物品,如身份证、驾驶证等。 - 认证票据存储在Cookie中,它的有效期与所在Cookie的有效期是独立的,如果Cookie没有过期,但是认证票据过期了,也无法通过认证。在下方讲解登录部分时,有针对认证票据有效期的详细说明。
Cookie.Expiration:Cookie的过期时间,即在浏览器中的保存时间,用于持久化Cookie。- 对应Cookie中的
Expires属性,是一个明确地时间点。 - 目前已被禁用,我们无法给它赋值。
- 对应Cookie中的
Cookie.MaxAge:Cookie的过期时间,即在浏览器中的保存时间,用于持久化Cookie。- 对应Cookie中的
Max-Age属性,是一个时间范围。 - 如果Cookie的
Max-Age和Expires同时设置,则以Max-Age为准 - 如果没有设置Cookie的
Expires,同时Cookie.MaxAge的值保持为null,那么该Cookie的有效期就是当前会话(Session),当浏览器关闭后,Cookie便会被清除(实际上,现在的部分浏览器有会话恢复功能,浏览器关闭后重新打开,Cookie也会跟着恢复,仿佛浏览器从未关闭一样)。
- 对应Cookie中的
SlidingExpiration:指示Cookie的过期方式是否为滑动过期。默认true。若为滑动过期,服务端收到请求后,如果发现Cookie的生存期已经超过了一半,那么服务端会重新颁发一个全新的Cookie,Cookie的过期时间和认证票据的过期时间都会被重置。Cookie.Name:该Cookie的名字,默认是.AspNetCore.Cookies。Cookie.Domain:该Cookie所属的域,对应Cookie的Domain属性。一般以“.”开头,允许subdomain都可以访问。默认为请求Url的域。Cookie.Path:该Cookie所属的路径,对应Cookie的Path属性。默认/。Cookie.SameSite:设置通过浏览器跨站发送请求时决定是否携带Cookie的模式,共有三种,分别是None、Lax和Strict。csharp1234567public enum SameSiteMode{Unspecified = -1,None,Lax,Strict}SameSiteMode.Unspecified:使用浏览器的默认模式。SameSiteMode.None:不作限制,通过浏览器发送同站或跨站请求时,都会携带Cookie。这是非常不建议的模式,容易受到CSRF攻击SameSiteMode.Lax:默认值。通过浏览器发送同站请求或跨站的部分GET请求时,可以携带Cookie。SameSiteMode.Strict:只有通过浏览器发送同站请求时,才会携带Cookie。- 更具体的内容,参考最下方的好文推荐
Cookie.HttpOnly:指示该Cookie能否被客户端脚本(如js)访问。默认为true,即禁止客户端脚本访问,这可以有效防止XSS攻击。Cookie.SecurePolicy:设置Cookie的安全策略,对应于Cookie的Secure属性。csharp123456public enum CookieSecurePolicy{SameAsRequest,Always,None}CookieSecurePolicy.Always:设置Secure=true,当发送登录请求和后续请求均为Https时,浏览器才将Cookie发送给服务端。CookieSecurePolicy.None:不设置Secure,即发送Http请求和Https请求时,浏览器都会将Cookie发送给服务端。CookieSecurePolicy.SameAsRequest:默认值。视情况而定,如果登录接口是Https请求,则设置Secure=true,否则,不设置。
Cookie.IsEssential:指示该Cookie对于应用的正常运行是必要的,不需要经过用户同意使用CookieManager:Cookie管理器,用于添加响应Cookie、查询请求Cookie或删除Cookie。默认是ChunkingCookieManager。DataProtectionProvider:认证票据加密解密提供器,可以按需提供相应的加密解密工具。默认是KeyRingBasedDataProtector。有关数据保护相关的知识,请参考官方文档-ASP.NET Core数据保护。TicketDataFormat:认证票据的数据格式,内部通过DataProtectionProvider提供的加密解密工具进行认证票据的加密和解密。默认是TicketDataFormat。
以下是部分事件回调:
Events.OnSigningIn:登录前回调Events.OnSignedIn:登录后回调Events.OnSigningOut:注销时回调Events.OnValidatePrincipal:验证 Principal 时回调
如果你觉得这样注册回调不优雅,那你可以继承自CookieAuthenticationEvents来实现自己的类,内部重写对应的方法即可,如:
|
1 |
public class MyCookieAuthenticationEvents : CookieAuthenticationEvents {} |
最后,在options处进行替换即可:options.EventsType = typeof(MyCookieAuthenticationEvents);
- 跨域(Cross Origin):请求的Url与当前页面的Url进行对比,协议、域名、端口号中任意一个不同,则视为跨域。
- 跨站(Cross Site):跨站相对于跨域来说,规则宽松一些,请求的Url与当前页面的Url进行对比,eTLD + 1不同,则视为跨站。
用户登录和注销
用户登录
现在,终于到了用户登录和注销了。还记得吗,方案中配置的登录、注销、禁止访问路径要和接口对应起来。
ASP.NET Core针对登录,提供了HttpContext的扩展方法SignInAsync,我们可以使用它进行登录。以下仅贴出Controller的代码,前端代码请参考github的源码。
|
1 2 3 4 5 6 7 8 9 10 11 12 13 14 15 16 17 18 19 20 21 22 23 24 25 26 27 28 29 30 31 32 33 34 35 36 37 38 39 40 41 42 43 44 45 46 47 48 49 50 51 52 |
public class AccountController : Controller { [HttpGet] public IActionResult Login([FromQuery] string returnUrl = null) { ViewBag.ReturnUrl = returnUrl; return View(); } [HttpPost] public async Task<IActionResult> Login([FromForm] LoginViewModel input) { ViewBag.ReturnUrl = input.ReturnUrl; // 用户名密码相同视为登录成功 if (input.UserName != input.Password) { ModelState.AddModelError("UserNameOrPasswordError", "无效的用户名或密码"); } if (!ModelState.IsValid) { return View(); } var identity = new ClaimsIdentity(CookieAuthenticationDefaults.AuthenticationScheme); identity.AddClaims(new[] { new Claim(ClaimTypes.NameIdentifier, Guid.NewGuid().ToString("N")), new Claim(ClaimTypes.Name, input.UserName) }); var principal = new ClaimsPrincipal(identity); // 登录 var properties = new AuthenticationProperties { IsPersistent = input.RememberMe, ExpiresUtc = DateTimeOffset.UtcNow.AddSeconds(60), AllowRefresh = true }; await HttpContext.SignInAsync(CookieAuthenticationDefaults.AuthenticationScheme, principal, properties); if (Url.IsLocalUrl(input.ReturnUrl)) { return Redirect(input.ReturnUrl); } return Redirect("/"); } } |
首先说一下Claim、Identity和Principal:
Claim:表示一条信息的声明。以我们的身份证为例,里面包含姓名、性别等信息,如“姓名:张三”、“性别:男”,这些都是Claim。Identity:表示一个身份。对于一个ClaimsIdentity来说,它是由一个或多个Claim组成的。我们的身份证就是一个Identity。Principal:表示用户本人。对于一个ClaimsPrincipal来说,它是由一个或多个ClaimsIdentity组成的。想一下,我们每个人的身份不仅仅只有一种,除了身份证外,还有驾驶证、会员卡等。
回到Login方法,首先声明了一个ClaimsIdentity实例,并将CookieAuthenticationDefaults.AuthenticationScheme作为认证类型来传入。需要注意的是,这个认证类型一定不要是null或空字符串,否则,默认配置下,你会得到如下错误:
|
1 |
InvalidOperationException: SignInAsync when principal.Identity.IsAuthenticated is false is not allowed when AuthenticationOptions.RequireAuthenticatedSignIn is true. |
随后,我们将用户的一些非敏感信息作为Claim存入到了ClaimsIdentity中,并最终将其放入ClaimsPrincipal实例。
在SignInAsync扩展方法中,我们可以针对认证进行一些配置,通过AuthenticationProperties。
IsPersistent:票据是否持久化,即票据所在的Cookie是否持久化。如果持久化,则会将下方ExpiresUtc的值设置为Cookie的Expires属性。默认为false。ExpiresUtc:票据的过期时间,默认为null,如果为null,则CookieAuthenticationHandler会在HandleSignInAsync方法中将Cookie认证方案配置中的CookieAuthenticationOptions.ExpireTimeSpan+AuthenticationProperties.IssuedUtc的结果赋值给该属性。AllowRefresh:上面提到过,在Cookie的认证方案配置中,可以将过期方式配置为滑动过期,满足条件时,会重新颁发Cookie。实际上,要实现这个效果,还要将AllowRefresh设置为null或者true才可以。默认为null。IssuedUtc:票据颁发时间,默认为null。一般无需手动赋值,为null时,CookieAuthenticationHandler会在HandleSignInAsync方法中将当前时间赋值给该属性。
这里针对认证票据的有效期详细说明一下:
通过上面我们已经得知,认证票据的有效期是通过AuthenticationProperties.ExpiresUtc来设置的,它是一个明确的时间点,如果我们没有手动赋值给该属性,那么Cookie的认证处理器CookieAuthenticationHandler会将Cookie认证方案配置中的CookieAuthenticationOptions.ExpireTimeSpan + AuthenticationProperties.IssuedUtc的结果赋值给该属性。
而我们又知道,在配置Cookie认证方案时,Cookie.Expiration属性表示的是Cookie的Expires属性,但是它被禁用了,如果强行使用它,我们会得到这样一段选项验证错误信息:
|
1 |
Cookie.Expiration is ignored, use ExpireTimeSpan instead. |
可是ExpireTimeSpan属性,注释明确地说它指的不是Cookie的Expires属性,而是票据的有效期,这又是咋回事呢?其实,你可以想象一下以下场景:该Cookie的Expires和Max-Age都没有被设置(程序允许它们为空),那么该Cookie的有效期就是当前会话,但是,你通过设置AuthenticationProperties.IsPersistent = true来表明该Cookie是持久化的,这就产生了歧义,实际上Cookie并没有持久化,但是代码却认为它持久化了。所以,为了解决这个歧义,Cookie.Expiration就被禁用了,而新增了一个ExpireTimeSpan属性,它除了可以作为票据的有效期外,还能在Cookie的Expires和Max-Age都没有被设置但AuthenticationProperties.IsPersistent = true的情况下,将值设置为Cookie的Expires属性,使得Cookie也被持久化。
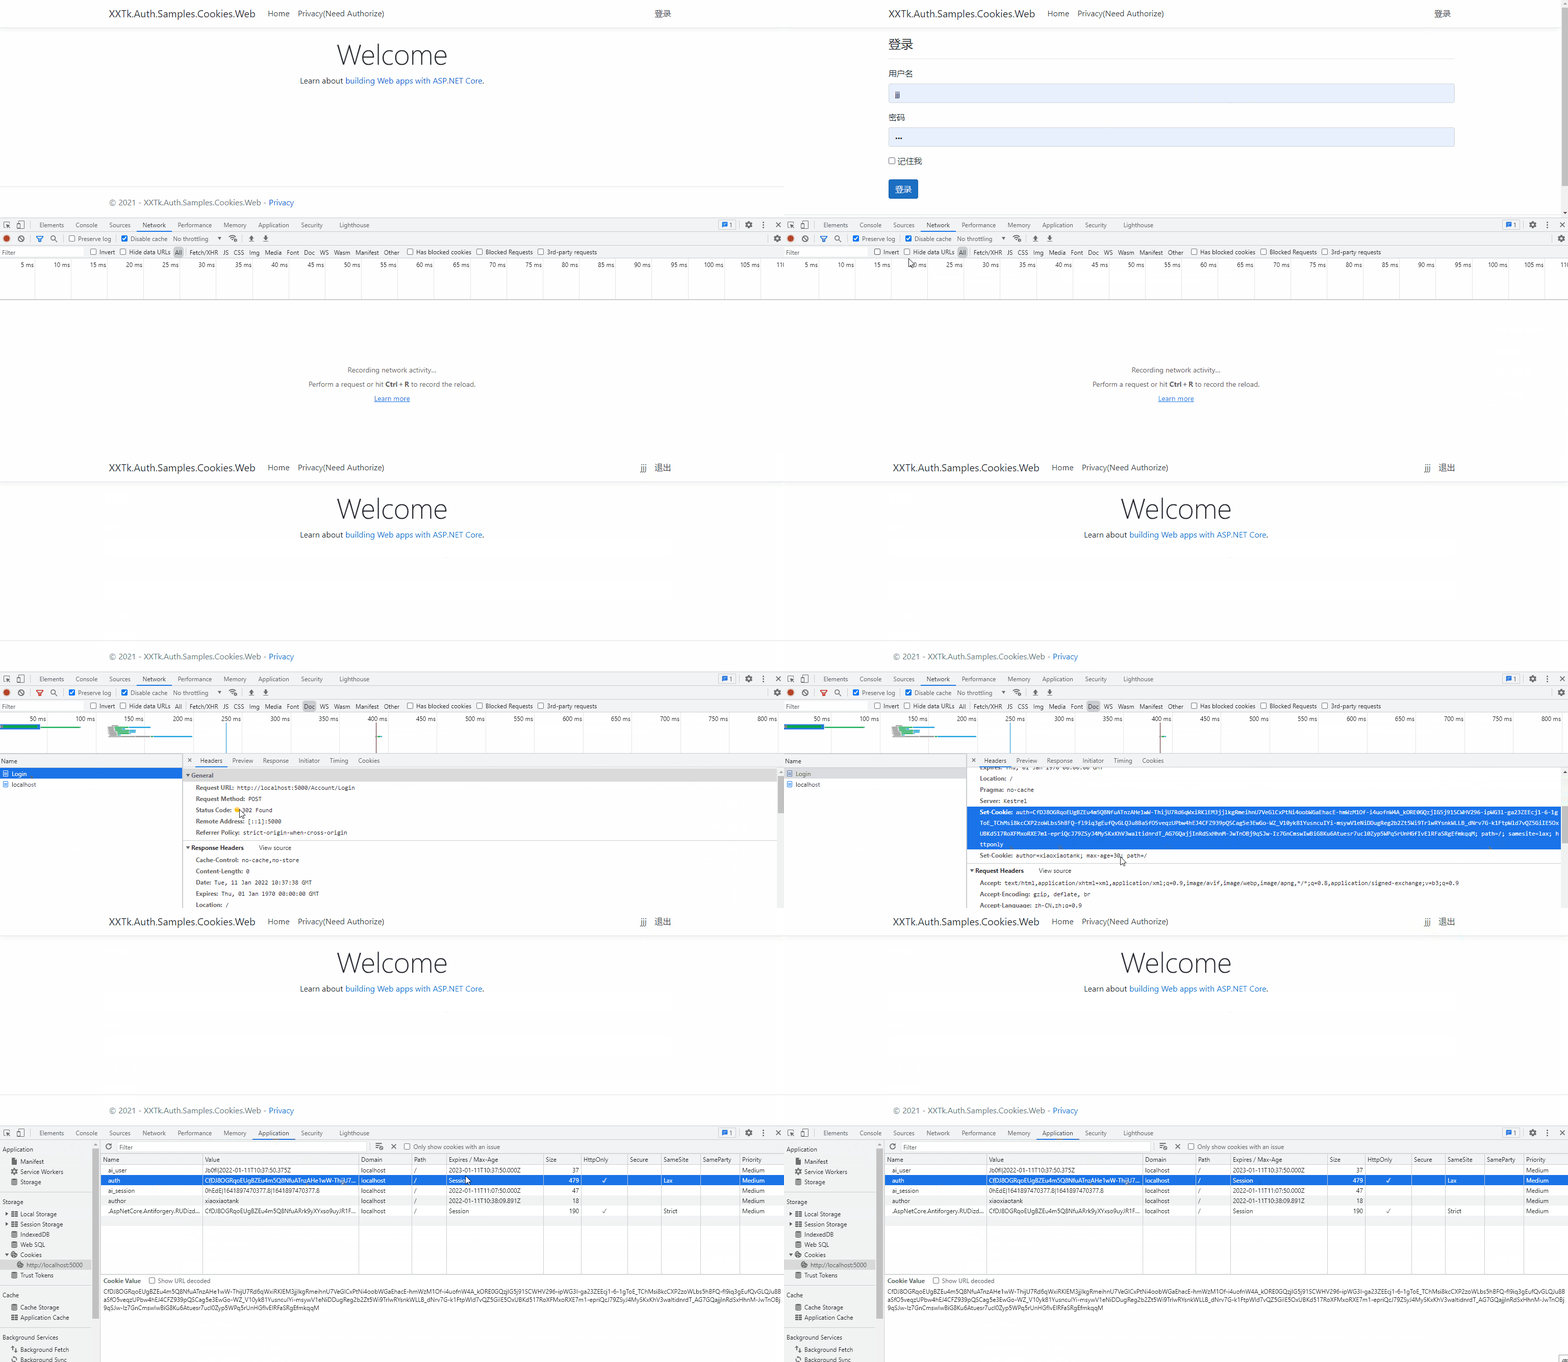
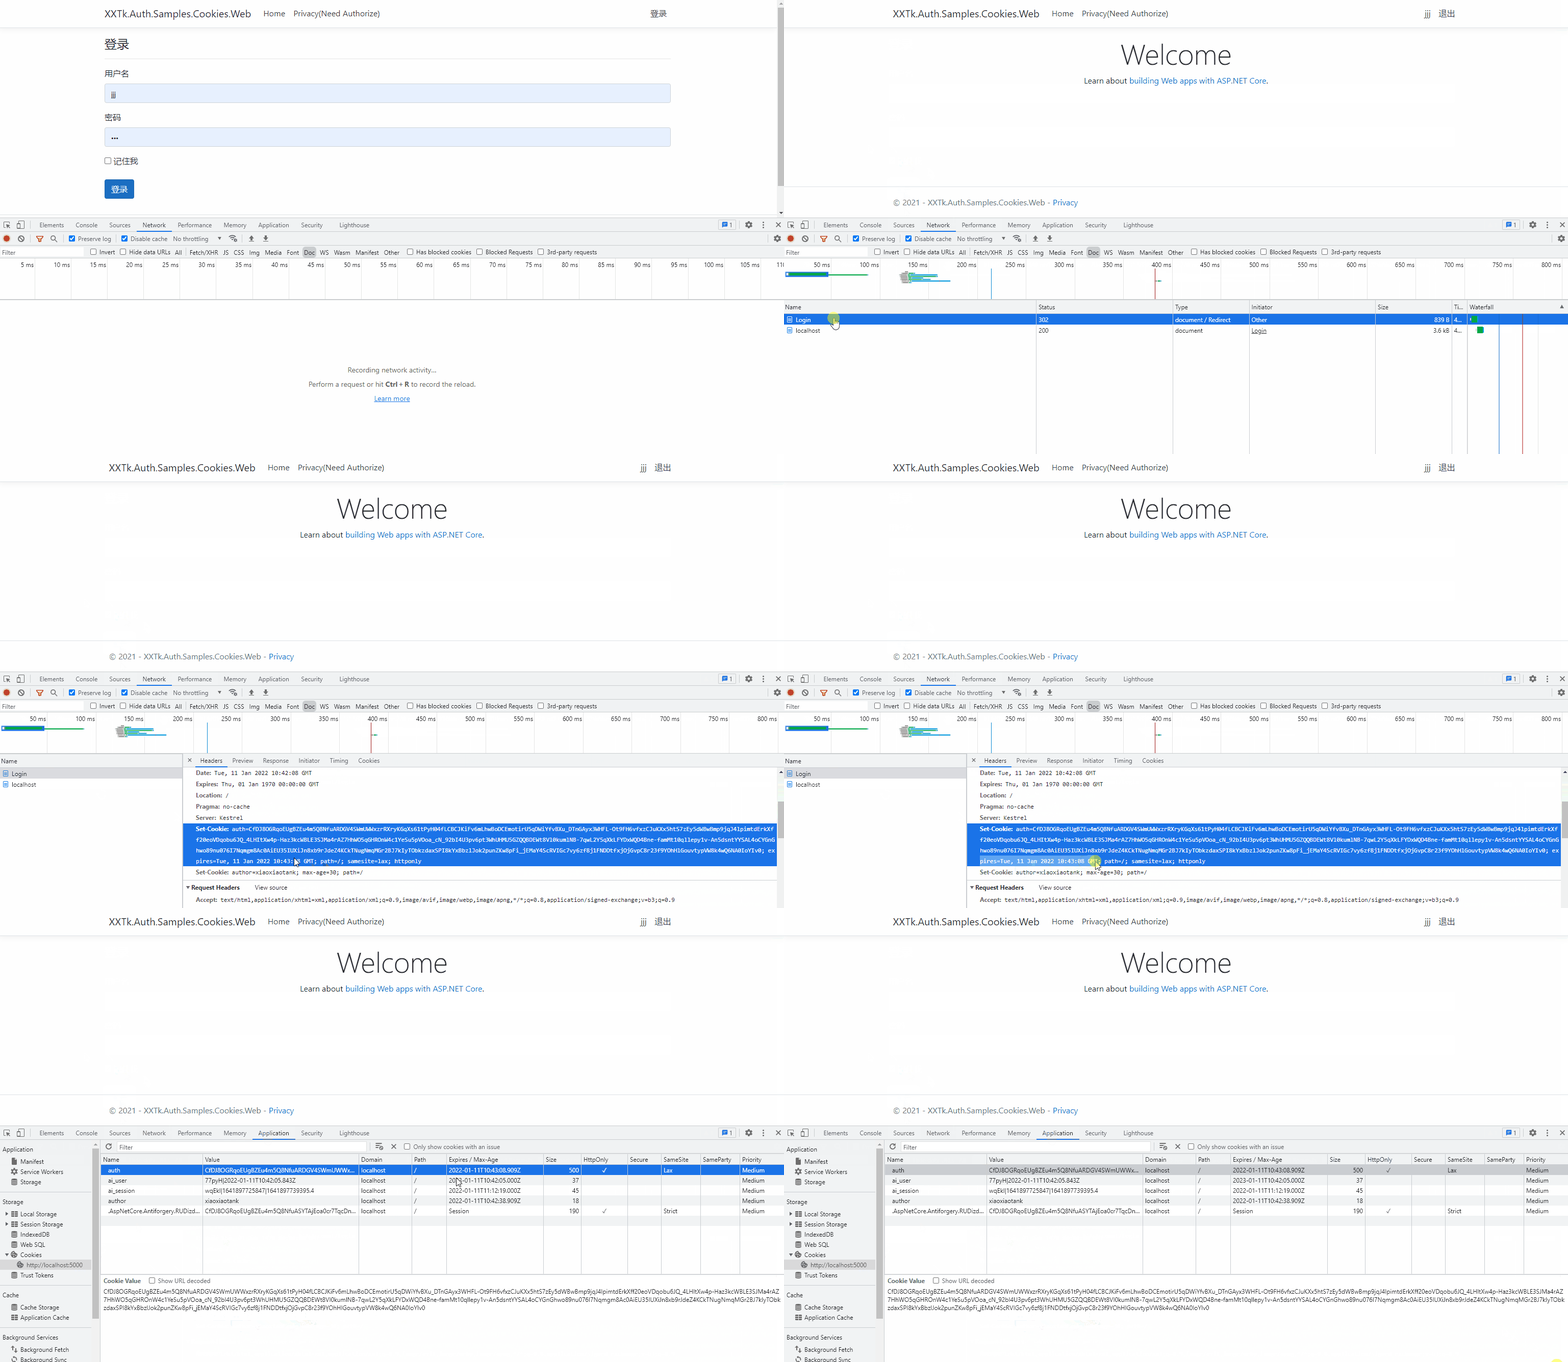
我们看一下登录效果:
其他的特性自己摸索一下吧!
下面是SignInAsync 的核心内部细节模拟,更多细节请查看AuthenticationService和CookieAuthenticationHandler:
|
1 2 3 4 5 6 7 8 9 10 11 12 13 14 15 16 17 18 19 20 21 22 23 24 25 |
public class AccountController : Controller { private readonly IOptionsMonitor<CookieAuthenticationOptions> _cookieAuthOptionsMonitor; public AccountController(IOptionsMonitor<CookieAuthenticationOptions> cookieAuthOptions) { _cookieAuthOptionsMonitor = cookieAuthOptions; } [HttpPost] public async Task<IActionResult> Login([FromForm] LoginViewModel input) { // ... var options = _cookieAuthOptionsMonitor.Get(CookieAuthenticationDefaults.AuthenticationScheme); var ticket = new AuthenticationTicket(principal, properties, CookieAuthenticationDefaults.AuthenticationScheme); // ticket加密 var cookieValue = options.TicketDataFormat.Protect(ticket, GetTlsTokenBinding(HttpContext)); // CookieOptions 就随便 new 个了,其实应该将 options 和 ticket 的配置转化为 CookieOptions options.CookieManager.AppendResponseCookie(HttpContext, options.Cookie.Name, cookieValue, new CookieOptions()); // ... } } |
用户注销
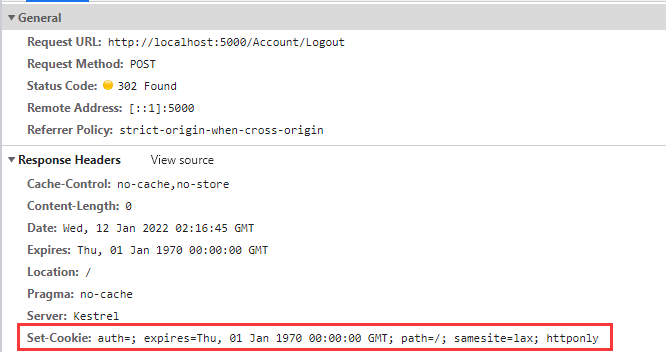
注销就比较简单了,就是将Cookie清除,不再进行赘述:
|
1 2 3 4 5 6 7 |
[HttpPost] public async Task<IActionResult> Logout() { await HttpContext.SignOutAsync(); return Redirect("/"); } |
至此,一个简单的基于Cookie的身份认证功能就实现了。
授权(Authorization)
添加授权中间件
要使用授权,需要先通过UseAuthorization添加授权中间件——AuthorizationMiddleware:
|
1 2 3 4 5 6 7 8 9 10 11 12 13 14 15 16 17 18 19 20 21 22 23 24 25 26 27 28 29 |
public class Startup { public void Configure(IApplicationBuilder app, IWebHostEnvironment env) { if (env.IsDevelopment()) { app.UseDeveloperExceptionPage(); } else { app.UseExceptionHandler("/Home/Error"); } app.UseStaticFiles(); app.UseRouting(); // 身份认证中间件 app.UseAuthentication(); // 授权中间件 app.UseAuthorization(); app.UseEndpoints(endpoints => { endpoints.MapControllerRoute( name: "default", pattern: "{controller=Home}/{action=Index}/{id?}"); }); } } |
UseAuthorization一定要放到UseRouting和UseAuthentication之后,因为授权中间件需要用到Endpoint。另外,还要放到UseEndpoints之前,否则请求在到达Controller之前,不会执行授权中间件。
授权配置
现在,授权中间件已经加好了,现在需要在ConfigureServices方法中添加授权所需要用到的服务并进行额外配置。
|
1 2 3 4 5 6 7 8 9 10 11 |
public class Startup { public void ConfigureServices(IServiceCollection services) { services.AddAuthorization(options => { options.DefaultPolicy = new AuthorizationPolicyBuilder().RequireAuthenticatedUser().Build(); options.InvokeHandlersAfterFailure = true; }); } } |
DefaultPolicy:默认的授权策略,默认为new AuthorizationPolicyBuilder().RequireAuthenticatedUser().Build(),即通过身份认证的用户才能获得授权。InvokeHandlersAfterFailure:当存在多个授权处理器时,若其中一个失败后,后续的处理器是否还继续执行。默认为true,即会继续执行。
Url添加授权
现在,我们要求用户登录后才可以访问/Home/Privacy,为其添加特性[Authorize],不需要传入策略policy,就用默认策略即可:
|
1 2 3 4 5 6 7 8 9 |
public class HomeController : Controller { [HttpGet] [Authorize] public IActionResult Privacy() { return View(); } } |
你可以尝试在其中访问
HttpContext.User,它其实就是我们登录时创建的ClaimsPrincipal。
全局Cookie策略
另外,我们可以通过UseCookiePolicy针对Cookie策略进行全局配置。需要注意的是,CookiePolicyMiddleware仅会对它之后添加的中间件起效,所以要尽量将它放在靠前的位置。
|
1 2 3 4 5 6 7 8 9 10 11 12 13 14 15 16 17 18 19 20 21 22 23 24 25 26 27 28 29 30 31 32 33 34 35 36 37 38 39 40 41 42 43 44 45 46 47 48 49 50 51 52 53 |
public class Startup { public void ConfigureServices(IServiceCollection services) { // Cookie全局策略 services.AddCookiePolicy(options => { options.OnAppendCookie = context => { Console.WriteLine("------------------ On Append Cookie --------------------"); Console.WriteLine($"Name: {context.CookieName}\tValue: {context.CookieValue}"); }; options.OnDeleteCookie = context => { Console.WriteLine("------------------ On Delete Cookie --------------------"); Console.WriteLine($"Name: {context.CookieName}"); }; }); services.AddControllersWithViews(); } public void Configure(IApplicationBuilder app, IWebHostEnvironment env) { if (env.IsDevelopment()) { app.UseDeveloperExceptionPage(); } else { app.UseExceptionHandler("/Home/Error"); } app.UseStaticFiles(); app.UseRouting(); // Cookie 策略中间件 app.UseCookiePolicy(); // 身份认证中间件 app.UseAuthentication(); // 授权中间件 app.UseAuthorization(); app.UseEndpoints(endpoints => { endpoints.MapControllerRoute( name: "default", pattern: "{controller=Home}/{action=Index}/{id?}"); }); } } |
优化改进
优化Claim以减小身份认证Cookie体积
在用户登录时,验证通过后,会添加Claims,其中“类型”使用的是微软提供的ClaimTypes:
|
1 2 |
new Claim(ClaimTypes.NameIdentifier, Guid.NewGuid().ToString("N")), new Claim(ClaimTypes.Name, input.UserName) |
细心地你会发现,ClaimTypes的值太长了:
|
1 2 3 4 5 6 |
public static class ClaimTypes { public const string Name = "http://schemas.xmlsoap.org/ws/2005/05/identity/claims/name"; public const string NameIdentifier = "http://schemas.xmlsoap.org/ws/2005/05/identity/claims/nameidentifier"; } |
我们可以使用JwtClaimTypes进行优化:
|
1 2 3 4 5 6 |
public static class JwtClaimTypes { public const string Id = "id"; public const string Name = "name"; } |
- 安装 IdentityModel 包
|
1 |
Install-Package IdentityModel |
- 进行替换,注意要在创建
ClaimsIdentity实例时指定Name和Role的类型,这样HttpContext.User.Identity.Name和HttpContext.User.IsInRole(string role)才能正常使用:
|
1 2 3 4 5 6 |
var identity = new ClaimsIdentity(CookieAuthenticationDefaults.AuthenticationScheme, JwtClaimTypes.Name, JwtClaimTypes.Role); identity.AddClaims(new[] { new Claim(JwtClaimTypes.Id, Guid.NewGuid().ToString("N")), new Claim(JwtClaimTypes.Name, input.UserName) }); |
在服务端存储Session信息
或许,你还是认为Cookie体积太大了,而且随着Cookie中存储信息的增加,还会越来越大,那你可以考虑将会话(Session)信息存储在服务端进行解决,这也在一定程度上对数据安全作了保护。
这个方案非常简单,我们将会话信息即认证票据保存在服务端而不是Cookie,Cookie中只需要存放一个SessionId。当请求发送到服务端时,会获取到SessionId,通过它,就可以从服务端获取到完整的Session信息。
会话信息的存储介质多种多样,可以是内存、也可以是分布式存储中间件,如Redis等,接下来我就以内存为例进行介绍(Redis的方案可以在我的示例程序源码中找到,这里就不贴了)。
在CookieAuthenticationOptions中,有个SessionStore,类型为ITicketStore,用来定义会话的存储,接下来我们就来实现它:
|
1 2 3 4 5 6 7 8 9 10 11 12 13 14 15 16 17 18 19 20 21 22 23 24 25 26 27 28 29 30 31 32 33 34 35 36 37 38 39 40 41 42 43 44 45 46 47 48 49 50 51 |
public class MemoryCacheTicketStore : ITicketStore { private const string KeyPrefix = "AuthSessionStore-"; private readonly IMemoryCache _cache; private readonly TimeSpan _defaultExpireTimeSpan; public MemoryCacheTicketStore(TimeSpan defaultExpireTimeSpan, MemoryCacheOptions options = null) { options ??= new MemoryCacheOptions(); _cache = new MemoryCache(options); _defaultExpireTimeSpan = defaultExpireTimeSpan; } public async Task<string> StoreAsync(AuthenticationTicket ticket) { var guid = Guid.NewGuid(); var key = KeyPrefix + guid.ToString("N"); await RenewAsync(key, ticket); return key; } public Task RenewAsync(string key, AuthenticationTicket ticket) { var options = new MemoryCacheEntryOptions(); var expiresUtc = ticket.Properties.ExpiresUtc; if (expiresUtc.HasValue) { options.SetAbsoluteExpiration(expiresUtc.Value); } else { options.SetSlidingExpiration(_defaultExpireTimeSpan); } _cache.Set(key, ticket, options); return Task.CompletedTask; } public Task<AuthenticationTicket> RetrieveAsync(string key) { _cache.TryGetValue(key, out AuthenticationTicket ticket); return Task.FromResult(ticket); } public Task RemoveAsync(string key) { _cache.Remove(key); return Task.CompletedTask; } } |
然后,只需要给CookieAuthenticationOptions.SessionStore赋值就好了:
|
1 |
options.SessionStore = new MemoryCacheTicketStore(options.ExpireTimeSpan); |
以下是一个存储在Cookie中的SessionId示例,虽然还是很长,但是它并不会随着信息量的增加而变大:
|
1 |
CfDJ8OGRqoEUgBZEu4m5Q8NfuATXjRKivKy7CR-oPpx2SaNJ8n1GWyBbPhNTEQzzIbZ62DqJPuxKtBJ752GqNxod9U5paaI_aQdH9EOH8nvgrinjvdHTneeKlhBvamEQrq7nA1e3wJOuQwFXRJASUphkS3kQzvc4-Upz27AAfoD510MC7YiwlhyxWl7agb8F0eeiilxAHDn4gskVqshu2hc5ENQAJNjXpa0yVaseryvsPrbukv5jqGC12WuUVe1cYhBIdWHHT61ZJcNtvNOAdtVlVA7i7RCJUBxNCUAhB-mw_s7R4GsNbU8aW7Ye9H-tx5067w |
好文推荐
源码请戳XXTk.Auth.Samples.Cookies.Web
from:https://www.cnblogs.com/wl-blog/p/16498648.html


