Spring Boot:整合Swagger文档
综合概述
spring-boot作为当前最为流行的Java web开发脚手架,越来越多的开发者选择用其来构建企业级的RESTFul API接口。这些接口不但会服务于传统的web端(b/s),也会服务于移动端。在实际开发过程中,这些接口还要提供给开发测试进行相关的白盒测试,那么势必存在如何在多人协作中共享和及时更新API开发接口文档的问题。
假如你已经对传统的wiki文档共享方式所带来的弊端深恶痛绝,那么尝试一下Swagger2 方式,一定会让你有不一样的开发体验。
使用 Swagger 集成文档具有以下几个优势:
- 功能丰富 :支持多种注解,自动生成接口文档界面,支持在界面测试API接口功能;
- 及时更新 :开发过程中花一点写注释的时间,就可以及时的更新API文档,省心省力;
- 整合简单 :通过添加pom依赖和简单配置,内嵌于应用中就可同时发布API接口文档界面,不需要部署独立服务。
实现案例
接下来,我们就通过Spring Boot 来整合Swagger实现在线API文档的功能。
生成项目模板
为方便我们初始化项目,Spring Boot给我们提供一个项目模板生成网站。
1. 打开浏览器,访问:https://start.spring.io/
2. 根据页面提示,选择构建工具,开发语言,项目信息等。
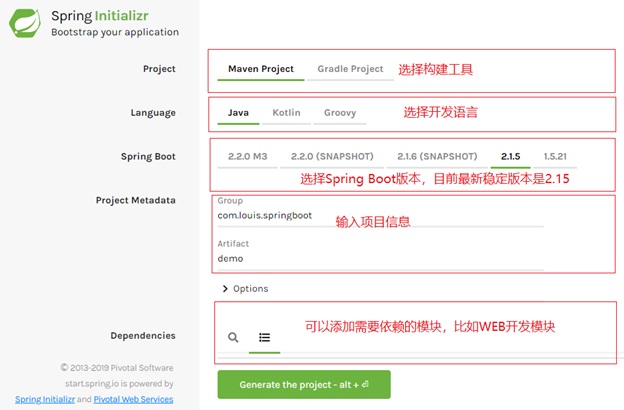
3. 点击 Generate the project,生成项目模板,生成之后会将压缩包下载到本地。
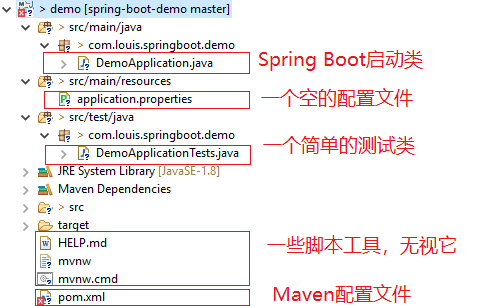
4. 使用IDE导入项目,我这里使用Eclipse,通过导入Maven项目的方式导入。
添加相关依赖
添加 Maven 相关依赖,这里需要添加上WEB和SWAGGER依赖。
WEB依赖
|
1 2 3 4 |
<dependency> <groupId>org.springframework.boot</groupId> <artifactId>spring-boot-starter-web</artifactId> </dependency> |
swagger依赖,这里选择 2.9.2 版本。
|
1 2 3 4 5 6 7 8 9 10 11 |
<!-- swagger --> <dependency> <groupId>io.springfox</groupId> <artifactId>springfox-swagger2</artifactId> <version>2.9.2</version> </dependency> <dependency> <groupId>io.springfox</groupId> <artifactId>springfox-swagger-ui</artifactId> <version>2.9.2</version> </dependency> |
添加配置类
添加一个swagger 配置类,在工程下新建 config 包并添加一个 SwaggerConfig 配置类。
SwaggerConfig.java
|
1 2 3 4 5 6 7 8 9 10 11 12 13 14 15 16 17 18 19 20 21 22 23 24 25 26 27 28 29 30 31 |
import org.springframework.context.annotation.Bean; import org.springframework.context.annotation.Configuration; import springfox.documentation.builders.ApiInfoBuilder; import springfox.documentation.builders.PathSelectors; import springfox.documentation.builders.RequestHandlerSelectors; import springfox.documentation.service.ApiInfo; import springfox.documentation.spi.DocumentationType; import springfox.documentation.spring.web.plugins.Docket; import springfox.documentation.swagger2.annotations.EnableSwagger2; @Configuration @EnableSwagger2 public class SwaggerConfig { @Bean public Docket createRestApi(){ return new Docket(DocumentationType.SWAGGER_2).apiInfo(apiInfo()) .select() .apis(RequestHandlerSelectors.any()) .paths(PathSelectors.any()).build(); } private ApiInfo apiInfo(){ return new ApiInfoBuilder() .title("Kitty API Doc") .description("This is a restful api document of Kitty.") .version("1.0") .build(); } } |
添加控制器
添加一个控制器,在工程下新建 controller包并添加一个 HelloController控制器。
HelloController.java
|
1 2 3 4 5 6 7 8 9 10 11 12 13 14 15 16 17 18 19 20 21 22 |
package com.louis.springboot.demo.controller; import org.springframework.web.bind.annotation.GetMapping; import org.springframework.web.bind.annotation.RequestParam; import org.springframework.web.bind.annotation.RestController; import io.swagger.annotations.Api; import io.swagger.annotations.ApiOperation; import io.swagger.annotations.ApiParam; /* 类注解 */ @Api(value = "desc of class") @RestController public class HelloController { /* 方法注解 */ @ApiOperation(value = "desc of method", notes = "") @GetMapping(value="/hello") public Object hello( /* 参数注解 */ @ApiParam(value = "desc of param" , required=true ) @RequestParam String name) { return "Hello " + name + "!"; } } |
编译运行测试
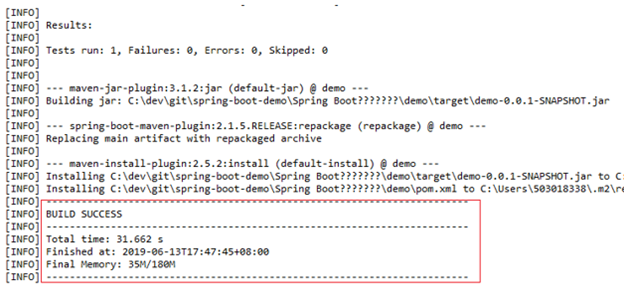
1. 右键项目 -> Run as -> Maven install,开始执行Maven构建,第一次会下载Maven依赖,可能需要点时间,如果出现如下信息,就说明项目编译打包成功了。
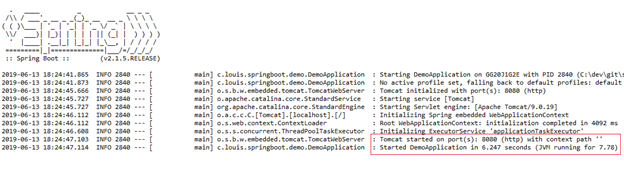
2. 右键文件 DemoApplication.java -> Run as -> Java Application,开始启动应用,当出现如下信息的时候,就说明应用启动成功了,默认启动端口是8080。
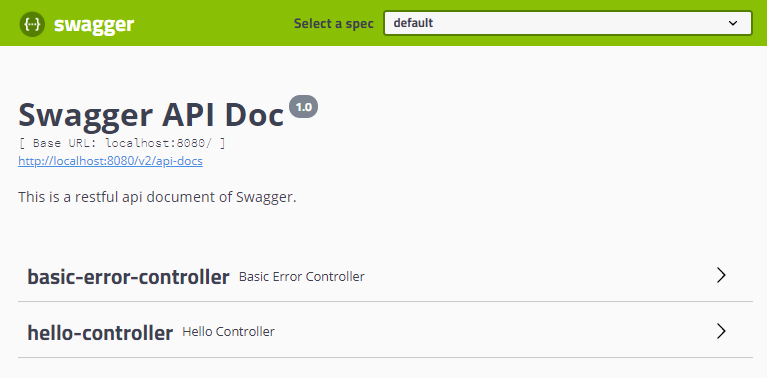
3. 打开浏览器,访问:http://localhost:8080/swagger-ui.html,进入swagger接口文档界面。
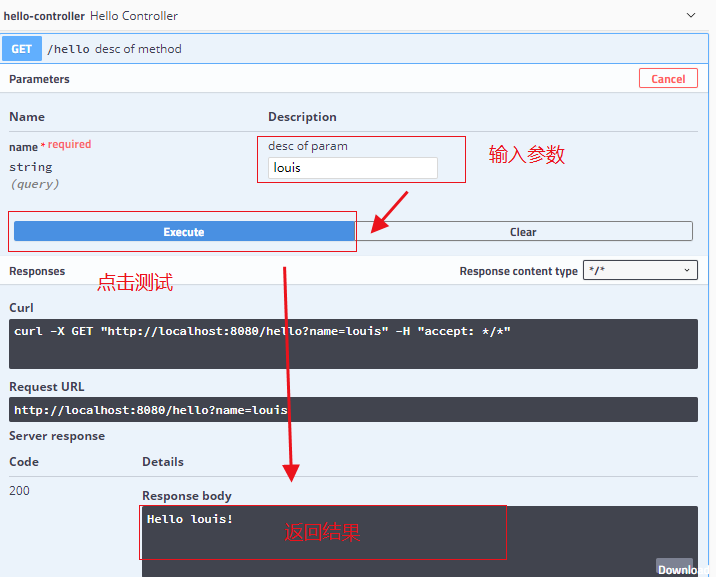
4. 展开hello-controller的hello接口,输入参数并点击执行,就可以看到接口测试结果了。
常用注解说明
swagger 通过注解接口生成文档,包括接口名,请求方法,参数,返回信息等。
@Api: 修饰整个类,用于controller类上
@ApiOperation: 描述一个接口,用户controller方法上
@ApiParam: 单个参数描述
@ApiModel: 用来对象接收参数,即返回对象
@ApiModelProperty: 对象接收参数时,描述对象的字段
@ApiResponse: Http响应其中的描述,在ApiResonse中
@ApiResponses: Http响应所有的描述,用在
@ApiIgnore: 忽略这个API
@ApiError: 发生错误的返回信息
@ApiImplicitParam: 一个请求参数
@ApiImplicitParam: 多个请求参数
更多使用说明,参考 Swagger 使用手册。
添加请求参数
在很多时候,我们需要在调用我们每一个接口的时候都携带上一些通用参数,比如采取token验证逻辑的往往在接口请求时需要把token也一起传入后台,接下来,我们就来讲解一下如何给Swagger添加固定的请求参数。
修改SwaggerConfig配置类,替换成如下内容,利用ParameterBuilder构成请求参数。
SwaggerConfig.java
|
1 2 3 4 5 6 7 8 9 10 11 12 13 14 15 16 17 18 19 20 21 22 23 24 25 26 27 28 29 30 |
@Configuration @EnableSwagger2 public class SwaggerConfig { @Bean public Docket createRestApi(){ // 添加请求参数,我们这里把token作为请求头部参数传入后端 ParameterBuilder parameterBuilder = new ParameterBuilder(); List<Parameter> parameters = new ArrayList<Parameter>(); parameterBuilder.name("token").description("令牌") .modelRef(new ModelRef("string")).parameterType("header").required(false).build(); parameters.add(parameterBuilder.build()); return new Docket(DocumentationType.SWAGGER_2).apiInfo(apiInfo()).select() .apis(RequestHandlerSelectors.any()).paths(PathSelectors.any()) .build().globalOperationParameters(parameters); // return new Docket(DocumentationType.SWAGGER_2).apiInfo(apiInfo()) // .select() // .apis(RequestHandlerSelectors.any()) // .paths(PathSelectors.any()).build(); } private ApiInfo apiInfo(){ return new ApiInfoBuilder() .title("Swagger API Doc") .description("This is a restful api document of Swagger.") .version("1.0") .build(); } } |
完成之后重新启动应用,再次查看hello接口,可以看到已经支持发送token请求参数了。

胡言乱语
前后端分离架构好,不用代码网页一起搞。
你写你页面,我写我接口,中间交由Swagger来接手。
文档风格简洁而优雅,接口测试简单又方便。
参考资料
官方网站:https://swagger.io/
使用手册:https://gumutianqi1.gitbooks.io/specification-doc/content/tools-doc/spring-boot-swagger2-guide.html
Maven仓库:https://mvnrepository.com/artifact/io.springfox/springfox-swagger-ui
相关导航
源码下载
码云:https://gitee.com/liuge1988/spring-boot-demo.git
作者:朝雨忆轻尘
出处:https://www.cnblogs.com/xifengxiaoma/
版权所有,欢迎转载,转载请注明原文作者及出处。
from:https://www.cnblogs.com/xifengxiaoma/p/11022146.html