All posts by 龙生
可插拔组件设计机制 —SPI
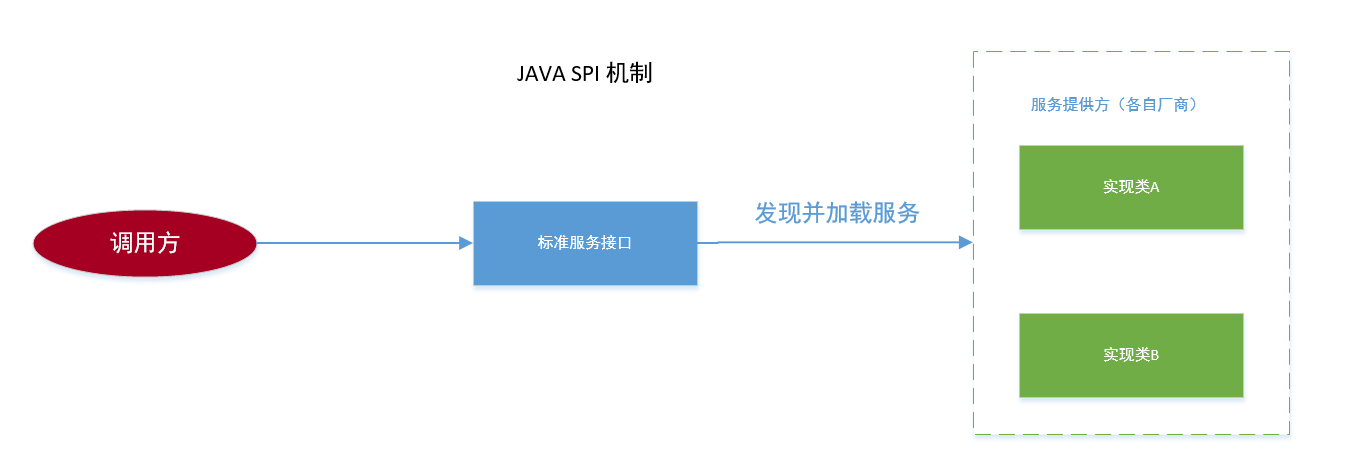
SPI 的全称是 Service Provider Interface, 即提供服务接口;是一种服务发现机制,SPI 的本质是将接口实现类的全限定名配置在文件中,并由服务加载器读取配置文件,加载实现类。这样可以在运行时,动态为接口替换实现类。正因此特性,我们可以很容易的通过 SPI 机制为我们的程序提供拓展功能。
View Details激活出现 错误0x800706F7 占位程序接收到错误数据
KMS 错误0x800706F7 占位程序接收到错误数据 (SWbemObjectEx) 解决办法: 退出360安全卫士。 from:https://blog.csdn.net/fff2666/article/details/126689909
View Detailsmaven引jar包
|
1 2 3 4 5 6 7 |
<dependency> <groupId>org.longsheng</groupId> <artifactId>itemName</artifactId> <version>1.0.0</version> <scope>system</scope> <systemPath>${project.basedir}/src/main/resources/lib/xxxx.jar</systemPath> </dependency> |
View Details
cURL命令的转换,Postman,语言代码
一、curl转不同语言代码 二、Postman 导入导出 curl 命令详细步骤 浏览器复制curl image.png 一、直接上地址,网站有教程 https://curl.trillworks.com/# 二、接口调试的时候经常会使用到。 1.postman导入curl 1)打开 postman , 点击左上角的 Import , 选择 Raw Text ,点击 Continue image.png image.png 2)点击 Import image.png 3)所有参数都已经配置好了,点击 send 发送请求 image.png 2.postman导出curl 1)在右侧 CODE 点击 image.png 2)选择 CURL(其他语言也可) image.png 作者:飞吧_5966 链接:https://www.jianshu.com/p/84bf836ce1c1 来源:简书 著作权归作者所有。商业转载请联系作者获得授权,非商业转载请注明出处。
View DetailsJava统计代码的执行时间的N种方法
在日常开发中经常需要测试一些代码的执行时间,但又不想使用向 JMH(Java Microbenchmark Harness,Java 微基准测试套件)这么重的测试框架,所以本文就汇总了一些 Java 中比较常用的执行时间统计方法。
View DetailsVUE项目build报错的解决办法(ERROR in static/js/vendor.xxxxx.js from UglifyJs)
一直运行很好的项目突然build报错了,错误信息如下:
|
1 2 3 |
ERROR in static/js/vendor.f1c68aa2d5e85847d30e.js from UglifyJs Unexpected token name «i», expected punc «;» [./node_modules/element-ui/src/utils/merge.js:2,0][static/js/vendor.f1c68aa2d5e85847d30e.js:17064,11] Build failed with errors. |
在 UglifyJs 的 github issues #78 找到了这样一个解决方案:由于 UglifyJs 只支持 ES5 而 element-ui 可能引入了一部分 ES6 的写法,所以导致 webpack 打包失败。issue 里最后给出的解决方案是用 beta 版本的Uglify-es 来代替 UglifyJs(Beta 版本引入了对 ES2015+)的支持。需要在前端工作目录下用执行命令 npm i -D uglifyjs-webpack-plugin@beta。 不过在尝试过后,发现 build error 的问题依然没有解决,在深入查找问题所在后,决定用 bable 来解析 element-ui, 要完成此操作只需要修改前端文件夹下的build/webpack.base.conf.js 文件即可,修改如下: 修改前
|
1 2 3 4 5 6 7 8 |
module: { rules: [ ... { test: /\.js$/, loader: 'babel-loader', include: [resolve('src'), resolve('test')] }, |
修改后
|
1 2 3 4 5 6 7 8 9 |
module: { rules: [ ... { test: /\.js$/, loader: 'babel-loader',//注意elementUI的源码使用ES6需要解析 include: [resolve('src'), resolve('test'),resolve('/node_modules/element-ui/src'),resolve('/node_modules/element-ui/packages')] }, ... |
相当于将 element-ui 加入需要 babel 解析的包中。 之后再次执行 npm run build, build 成功。 转载自以下文章: 原文地址 from:https://blog.csdn.net/sing_sing/article/details/79146265
View DetailsRedisTemplate最全的常用方法
1.RedisTemplate常用方法
2.String类型
3.Hash类型
4.List类型
5.Set类型
6.zSet类型
Redis常用的数据类型:String、Hash、List、Set、zSet
在Spring Boot中使用RedisTemplate的时候出现乱码
当我们使用RedisTemplate向我们的Redis数据库中set(“originName”)时,我们在服务端中获取该key的时候出现了乱码\xac\xed\x00\x05t\x00\noriginName` 原因:因为我们springboot中的RedisTemplate将我们的key保存的时候会将其进行序列化,此时我们在别的客户端获取的时候机会出现乱码。 解决:我们需要自己定义我们的RedisTemplate中的序列化机制
|
1 2 3 4 5 6 7 8 9 10 11 12 13 14 15 |
@Configuration public class RedisTemplateConfig { @Bean public RedisTemplate<Object,Object> redisTemplate(RedisConnectionFactory connectionFactory){ RedisTemplate<Object, Object> objectObjectRedisTemplate = new RedisTemplate<>(); objectObjectRedisTemplate.setKeySerializer(new StringRedisSerializer()); objectObjectRedisTemplate.setHashKeySerializer(new StringRedisSerializer()); objectObjectRedisTemplate.setConnectionFactory(connectionFactory); return objectObjectRedisTemplate; } } |
由于我们获取值时会将它进行反序列化,我们就无须设置value的反序列化 from:https://blog.csdn.net/ebdbbd/article/details/126266968 另一个版本:
|
1 2 3 4 5 6 7 8 9 10 11 12 13 |
@Bean public RedisTemplate redisTemplate(RedisConnectionFactory redisConnectionFactory , GenericJackson2JsonRedisSerializer genericJackson2JsonRedisSerializer , StringRedisSerializer stringRedisSerializer) { RedisTemplate objectObjectRedisTemplate = new RedisTemplate(); objectObjectRedisTemplate.setConnectionFactory(redisConnectionFactory); objectObjectRedisTemplate.setKeySerializer(stringRedisSerializer); objectObjectRedisTemplate.setValueSerializer(genericJackson2JsonRedisSerializer); objectObjectRedisTemplate.setHashKeySerializer(stringRedisSerializer); objectObjectRedisTemplate.setHashValueSerializer(genericJackson2JsonRedisSerializer); return objectObjectRedisTemplate; } |
View Details
PHP获取当前时间、年份、月份、日期和天数
获取当前时间,需要用到 PHP Date() 函数。 PHP Date() 把时间戳格式化为更易读的日期和时间。 语法:
|
1 |
date(format,timestamp) |
其中参数 format 为显示格式,参数 timestamp 为时间戳,是可选择的,默认为 time() ,即如果没有给出时间戳则使用本地当前时间。 format 格式参数在这里简单介绍几个: 一些常用于日期的字符: Y – 完整表示年份(四位数字:2019) y – 表示年份(两位数字:19) F – 表示月份(完整的文本格式: January 或者 March) M – 表示月份(3个字母:Jun) m – 表示月份,有前导0(数字:04) n – 表示月份,无前导0(数字:4) d – 表示月份中的第几天,有前导0(01-31) j – 表示月份中的第几天,无前导0(1-31) D – 表示星期几(3字母:Wed) l – 表示星期几(完整英文:Wednesday) w – 表示星期中的第几天(数字,0表示星期天) W – 表示一年中的第几周 z – 表示一年中的第几天(0-366) 实例:
|
1 2 3 4 5 6 |
<?php echo "<p>今天是:" . date("Y/m/d") . "</p>"; echo "<p>今天是:" . date("Y.m.d") . "</p>"; echo "<p>今天是:" . date("Y-m-d") . "</p>"; echo "<p>今天是:" . date("l") . "</p>"; ?> |
运行结果: 如果想要中文的年月日,可以这样写:
|
1 |
echo "现在时间是:" . date("Y年m月d日"); |
运行结果: 今天是:2019年04月24日 获得简单的时间: 常用于时间的字符: H – 24小时格式,有前导0(08,18) h – 12小时格式,有前导0(06,11) G – 24小时格式,无前导0(9,17) g – 12小时格式,无前导0(6,12) i – 表示分钟,有前导0(00-59) s […]
View Detailshtml颜色代码暗黑模式,Html页面支持暗黑模式如何实现 Html页面支持暗黑模式实现代码…
本篇文章小编给大家分享一下Html页面支持暗黑模式实现代码,小编觉得挺不错的,现在分享给大家供大家参考,有需要的小伙伴们可以来看看。 准备 其实,我们只是需要使用到css中的prefers-color-scheme 媒体查询。 no-preference 表示用户未制定操作系统主题。作为布尔值时,为false 输出。 light 表示用户的操作系统是浅色主题。 dark 表示用户的操作系统是深色主题。 说明 此方法只是一个简单demo,可以使用该方法拓展出其他实现方式。 prefers-color-scheme说明 DEMO地址 HTML 页面适应黑暗模式 测试文字 CSS
|
1 2 3 4 5 6 7 8 9 10 11 12 13 14 15 16 17 |
.back {background: white; color: #555;text-align: center} @media (prefers-color-scheme: dark) { .back {background: #333; color: white;} .models {border:solid 1px #00ff00} } @media (prefers-color-scheme: light) { .back {background: white; color: #555;} .models {border:solid 1px #2b85e4} } |
from:https://blog.csdn.net/weixin_39610678/article/details/117835878
View Details
